Getting Started with Vaultli
Everything a new collector needs to organize, value, protect, and — if you choose — share an inventory. This guide walks through the platform in the order most new users actually need it: set up your profile, shape your schemas, catalog your first items, then track their value and visibility over time.
1. The Core Architecture & Your Profile
Before you catalog a single item, it helps to understand how Vaultli actually organizes your data. Everything you own lives inside one consistent three-level structure, and every other feature in the app — filtering, valuation, the Marketplace, exports — is built on top of it.
The Hierarchy: Collections → Groups → Items
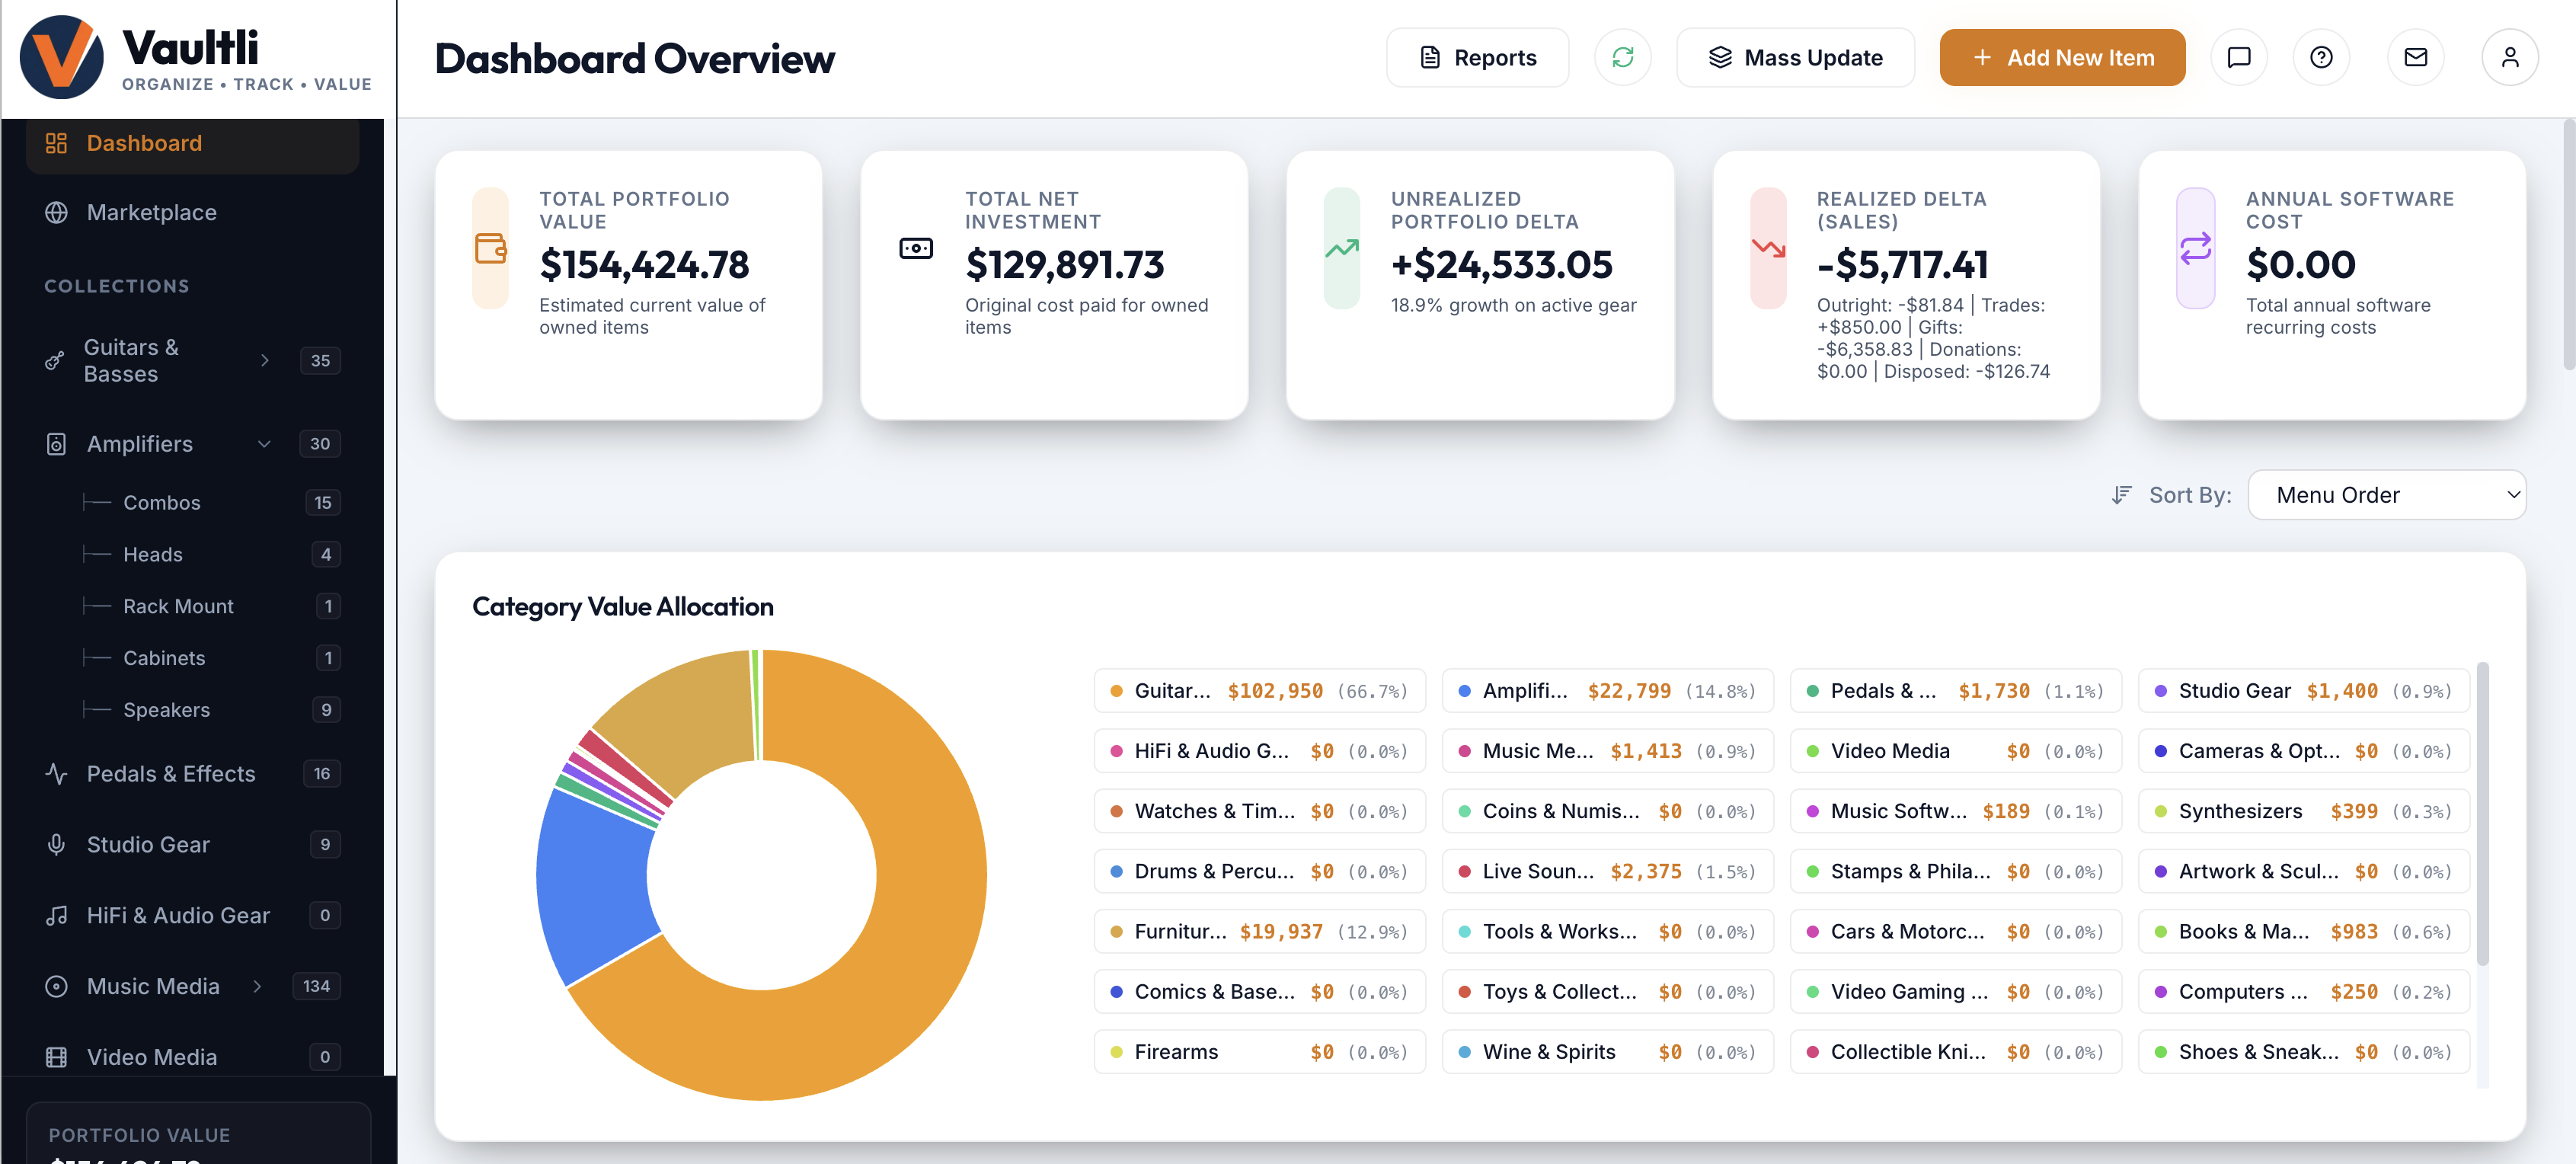
At the top level are Collections — broad categories like Music Media, Guitars & Basses, or Amplifiers. These appear in the left sidebar under Collections and are the main unit the rest of the app organizes around (each has its own schema, default view, and dashboard rollup).
Many Collections are further broken into Groups — sub-categories that share the parent's schema but let you segment a large Collection logically. In the screenshot below, Amplifiers is split into Combos, Heads, Rack Mount, Cabinets, and Speakers, each with its own item count.
At the bottom of the hierarchy are Items — the actual physical objects you own, each one a single record with its own specs, photos, financials, and ownership status.
Configuring System Preferences
Your account-wide preferences live under Settings → App Preferences. From there you can currently configure:
- Color Scheme — Light, Dark, or System, which automatically follows your operating system's own theme setting.
- Default View States — the layout each Collection opens in (Rich Card Grid, Dense Grid, or Detail Table) is set per-category in the Category Schema & Layout Editor covered in Chapter 2, and the Global Discover Marketplace has its own independent default view setting in App Preferences.
- Status Colors — the color swatch associated with each ownership status (Owned, Wishlist, Sold, and so on) can be customized per-status, with a one-click reset back to the defaults.
A note on scope: Vaultli's financial fields currently run on a single fixed currency (USD), and there isn't yet a separate imperial/metric measurement-unit toggle — dimensions and weights are captured as ordinary custom fields per category today. Multi-currency and metric/imperial unit support are on the radar as a possible future enhancement, so there's no need to hunt for either one in Settings just yet.
Cloud Sync States, Explained
The small sync icon in the top toolbar tells you, at a glance, whether your local changes have made it to the cloud. Hover over it at any time to see the exact status in a tooltip:
Green — Synced
Everything is up to date. If you're signed in, this means "Connected to Supabase (Cloud Synced)"; if you're using the app signed out, it means your local copy is simply fully in sync with itself.
Amber — Syncing
A save is actively in flight to the cloud. The icon spins while "Synchronizing database…" is underway, then settles back to green.
Red — Offline / Sync Error
Either your connection dropped or the last cloud write failed. Nothing is lost: Vaultli keeps working entirely from its local cache and automatically retries once you're back online.
That local cache is your browser's own storage — so a closed tab or a temporary network drop never blocks data entry. As soon as connectivity returns, queued changes flush to the cloud automatically and the icon returns to green.
2. Schemas, Fields & Form Customization
Every Collection's data-entry form is generated from a schema — an ordered list of fields, grouped into sections, that determines exactly what you're asked to fill in and how it's displayed afterward. Understanding schemas is the single most valuable thing to learn early, because it's what makes Vaultli feel purpose-built for whatever you collect.
System Fields vs. Custom Fields
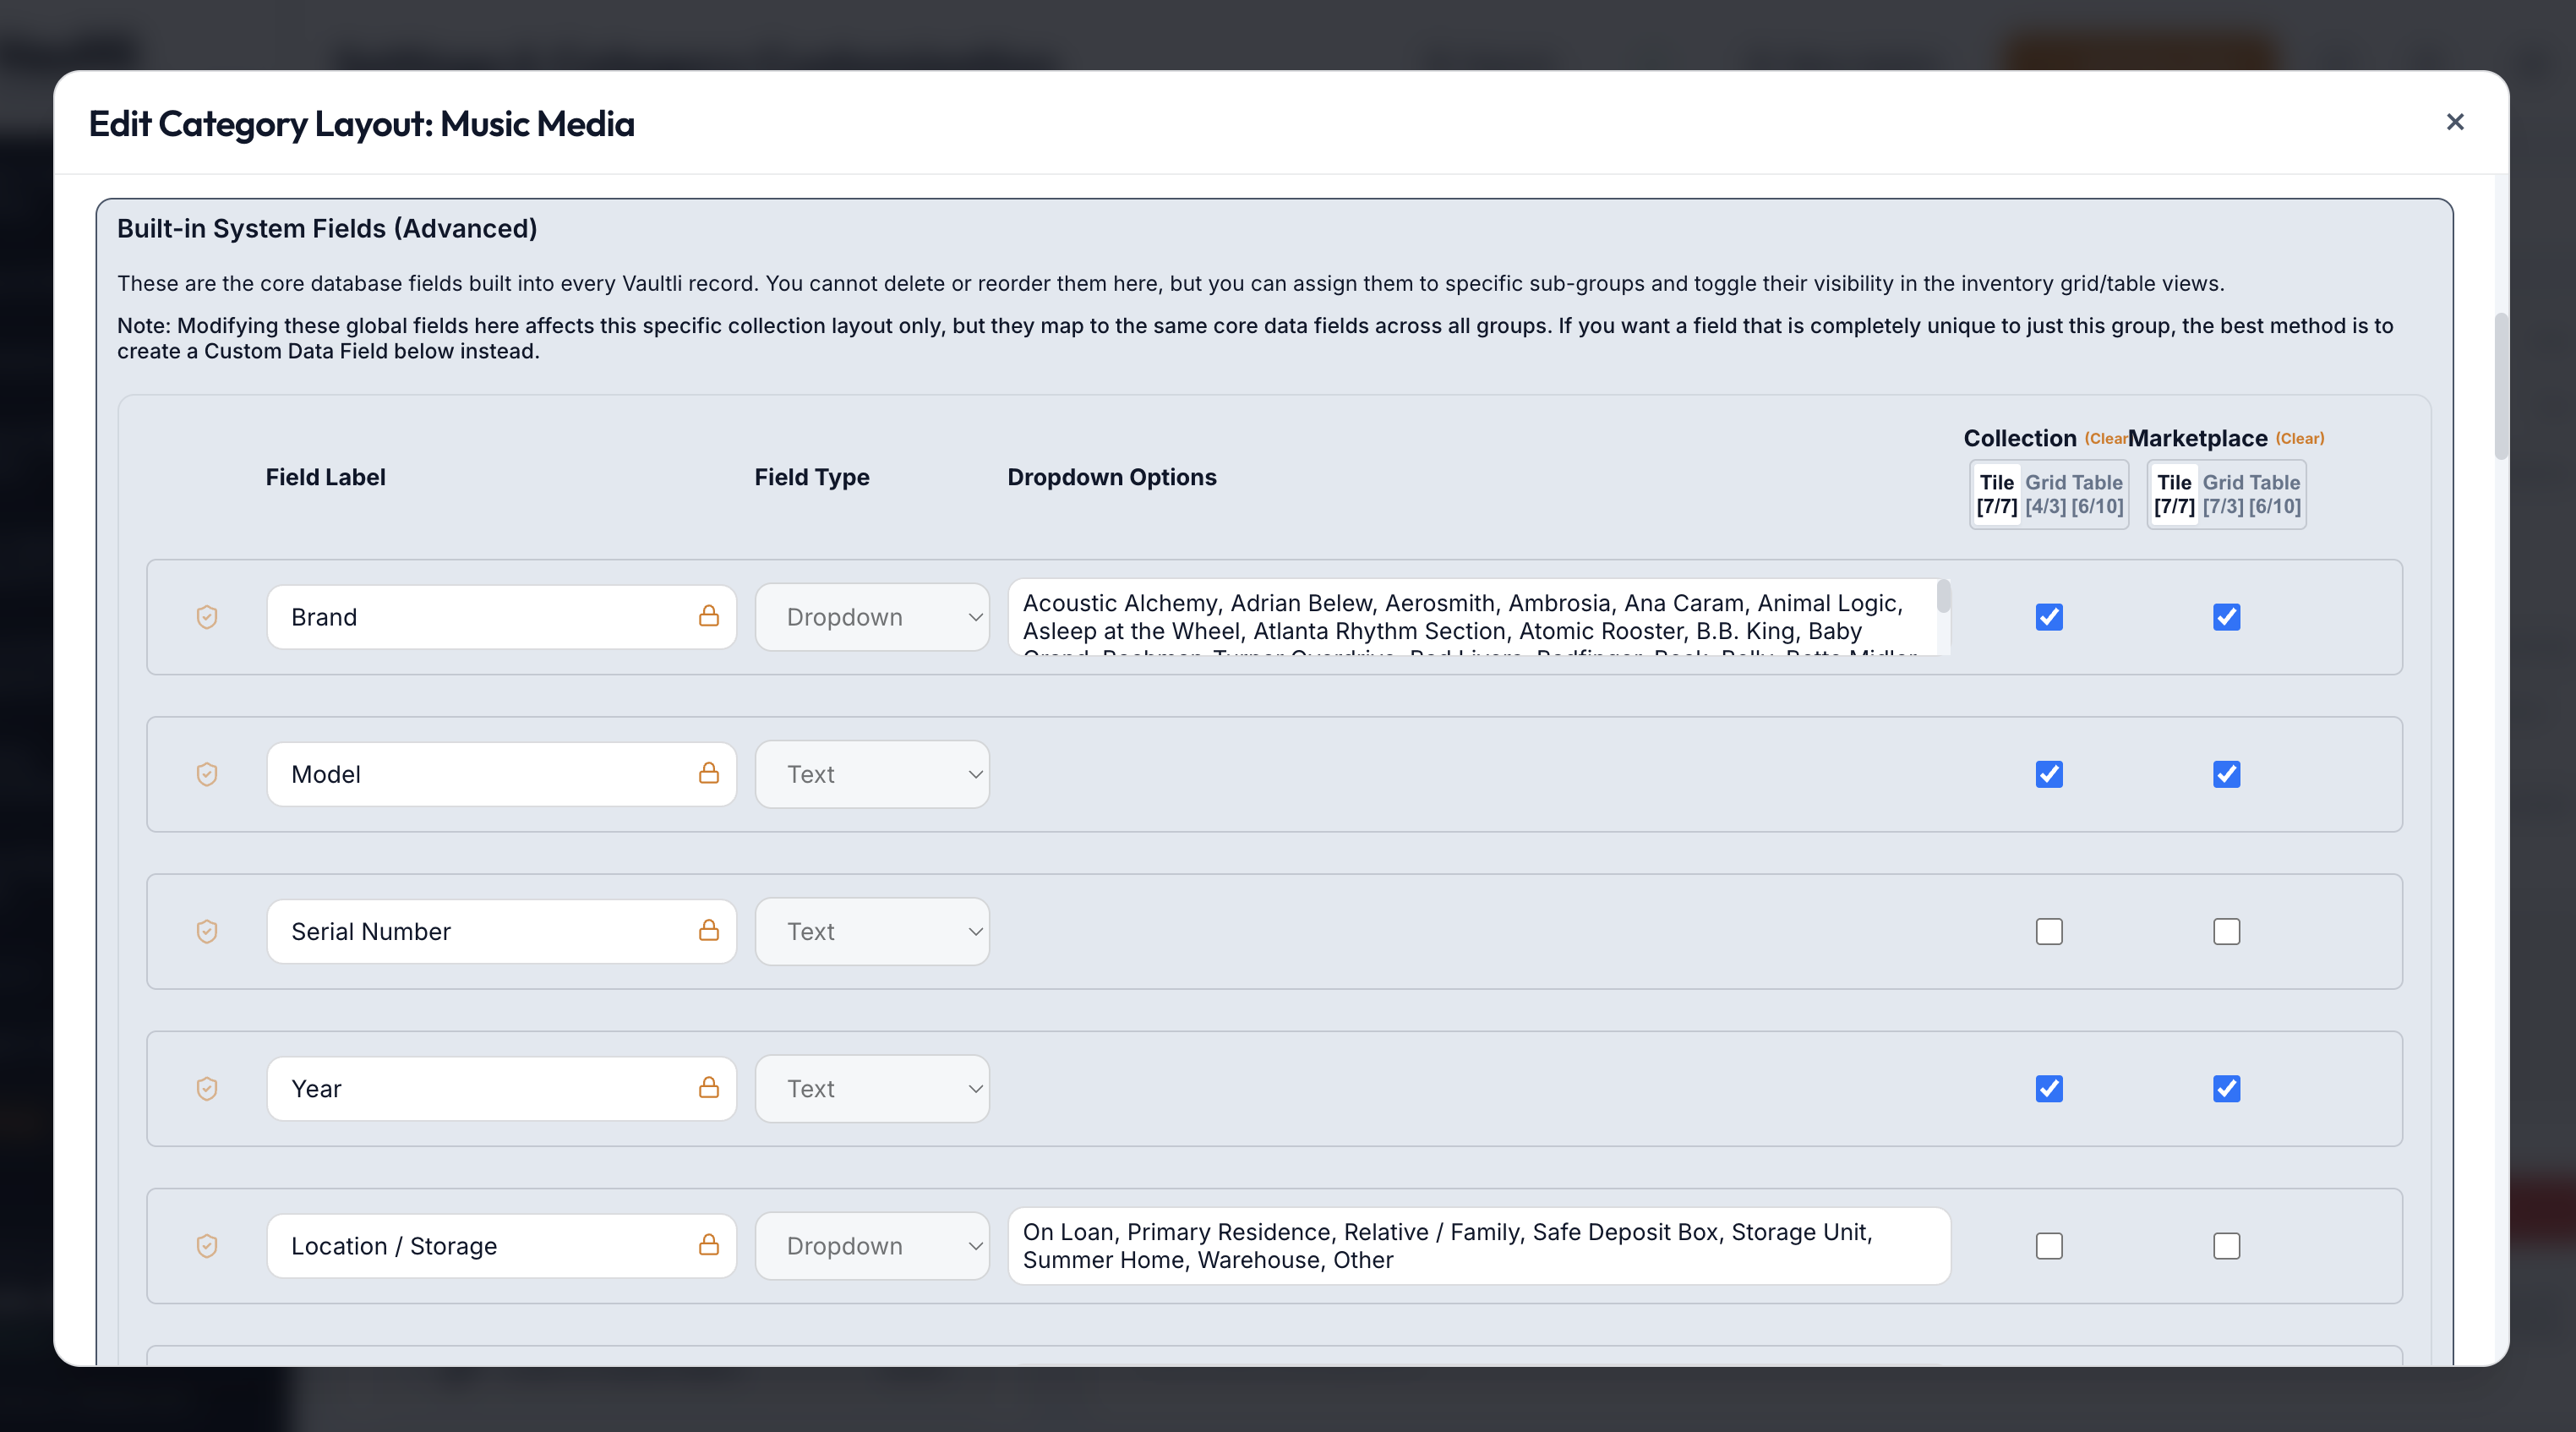
System fields — Brand, Model, Serial Number, Year, Condition, Source, Purchase Date, Current Value, Notes, and similar — exist on every item in every Collection, using the exact same underlying key every time. That consistency is what anchors global reporting: the Dashboard can total your entire portfolio's value, a CSV export has stable column names, and cross-category search works at all, precisely because these fields never change shape from one Collection to the next.
Custom fields are the opposite by design: scoped to a single Collection, so you can capture the deep, specific detail a general-purpose schema never could — a "Pressing Type" and "Disc Size / Speed" for vinyl records, or "Pickup Configuration" for a guitar. This is where Vaultli stops being a generic spreadsheet and starts being a real catalog for your specific hobby.
The Category Schema & Layout Editor
Open it from Settings → Collections → [your category] → Edit Layout. Every field — system or custom — is listed as a row where you control its type, its dropdown options (if any), and its visibility independently across your own Collection view and the Marketplace.
Renaming Fields with Aliases
Every system field — Brand, Model, Year, Serial Number, and Notes — can carry an alias: a per-category display label that replaces the generic name on the item form and throughout that Collection's views, without changing the underlying field or breaking cross-category reporting described above. This is what lets one consistent data model feel purpose-built for wildly different collections. A few examples already shipped as sensible defaults:
- In Music Media, Brand becomes Artist / Band / Label.
- In Books & Magazines, Brand becomes Publisher, Model becomes Book Title, Year becomes Publication Year, and Serial Number becomes ISBN / Barcode.
- In Artwork & Sculptures, Model becomes Title of Work.
To set or change one, open the Layout Editor for the category (Settings → Collections → [your category] → Edit Layout) and look for the Field Aliases controls alongside the field list. The Notes field is a special case: it accepts both a custom label (what the field is called) and a custom placeholder prompt (the hint text shown before you start typing) — handy for turning a generic "Notes" box into something like "Provenance & Condition History" with prompt text guiding what to record there.
When you add a new custom field, you'll choose from these types:
| Type | Best for |
|---|---|
| Text | Free-form single-line values — catalog numbers, pickup names, anything without a fixed vocabulary. |
| Date | Calendar-pickable dates outside the built-in Purchase/Valuation dates. |
| Text Area (Multi-line) | Longer free-text — provenance notes, condition detail, anything paragraph-length. |
| Dropdown | A fixed, editable list of choices — the most common type for anything with a natural, repeatable vocabulary. |
| Checkbox | Simple yes/no flags. |
| Auto-Numbered List (Continuous or Restart-at-Breaks) | Tracklists and similar sequences — a genuinely distinctive Vaultli field type, with an inline "Auto-Renumber" control. |
Financial and numeric fields are system fields, not a custom type. Purchase Cost, Current Value, and the rest of the Financial Portfolio section are built-in system fields with their own number handling; a new custom field doesn't currently offer a generic "Number" or "Currency" type of its own.
Managing Dropdown Option Lists in Bulk
Dropdown fields (Condition, Source, Status, and any custom Dropdown you create) each keep their own reusable list of options, editable from Settings → Dropdown Options. For quick one-off changes, add or remove a single value directly in the list. When you need to clean up a whole list at once — reordering it, fixing a batch of typos, or removing several stale values in one pass — click Bulk Edit to open a plain-text editor with one option per line: edit the text freely and save to replace the entire list in a single step.
Bulk Edit protects your data on the way out: if you delete a line for an option that's still assigned to one or more items, saving is blocked and Vaultli tells you exactly which values are in use and how many items reference each one. To retire an in-use option, use the single "X" button next to it in the regular list instead, which walks you through reassigning affected items.
Positioning & Ordering Fields
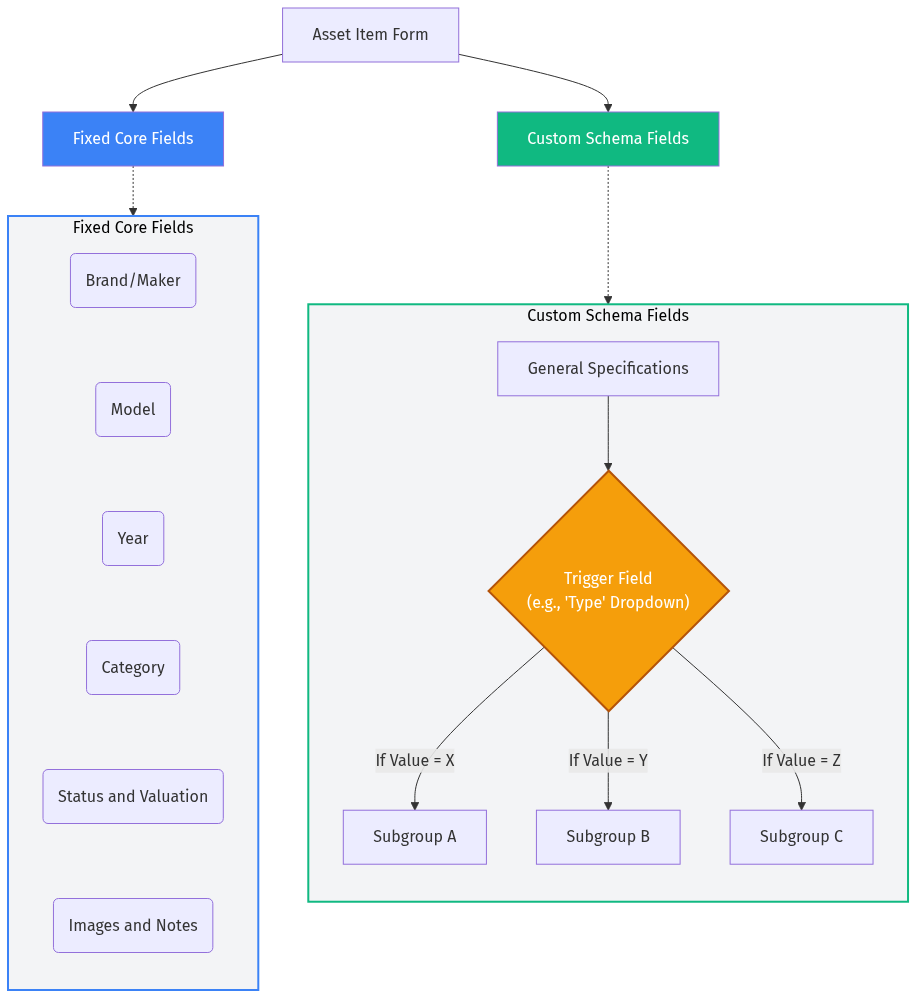
Field rows can be dragged up and down directly in the Layout Editor to reorder them, and assigned to one or more Sub-Groups — named sections (like "General Specifications" or "Vinyl") that structure the item entry modal into logical chunks instead of one long list. Sub-groups can even be made conditional: shown only when another field (a "Type" dropdown, say) is set to a particular value, so the form only ever shows fields that are actually relevant to the specific item being entered.
3. Cataloging Items & Rich Media
With a schema in place, adding an item is a straightforward form fill — accelerated wherever possible by scanning and autofill so you spend your time collecting, not typing.
Step-by-Step: Creating an Asset Record
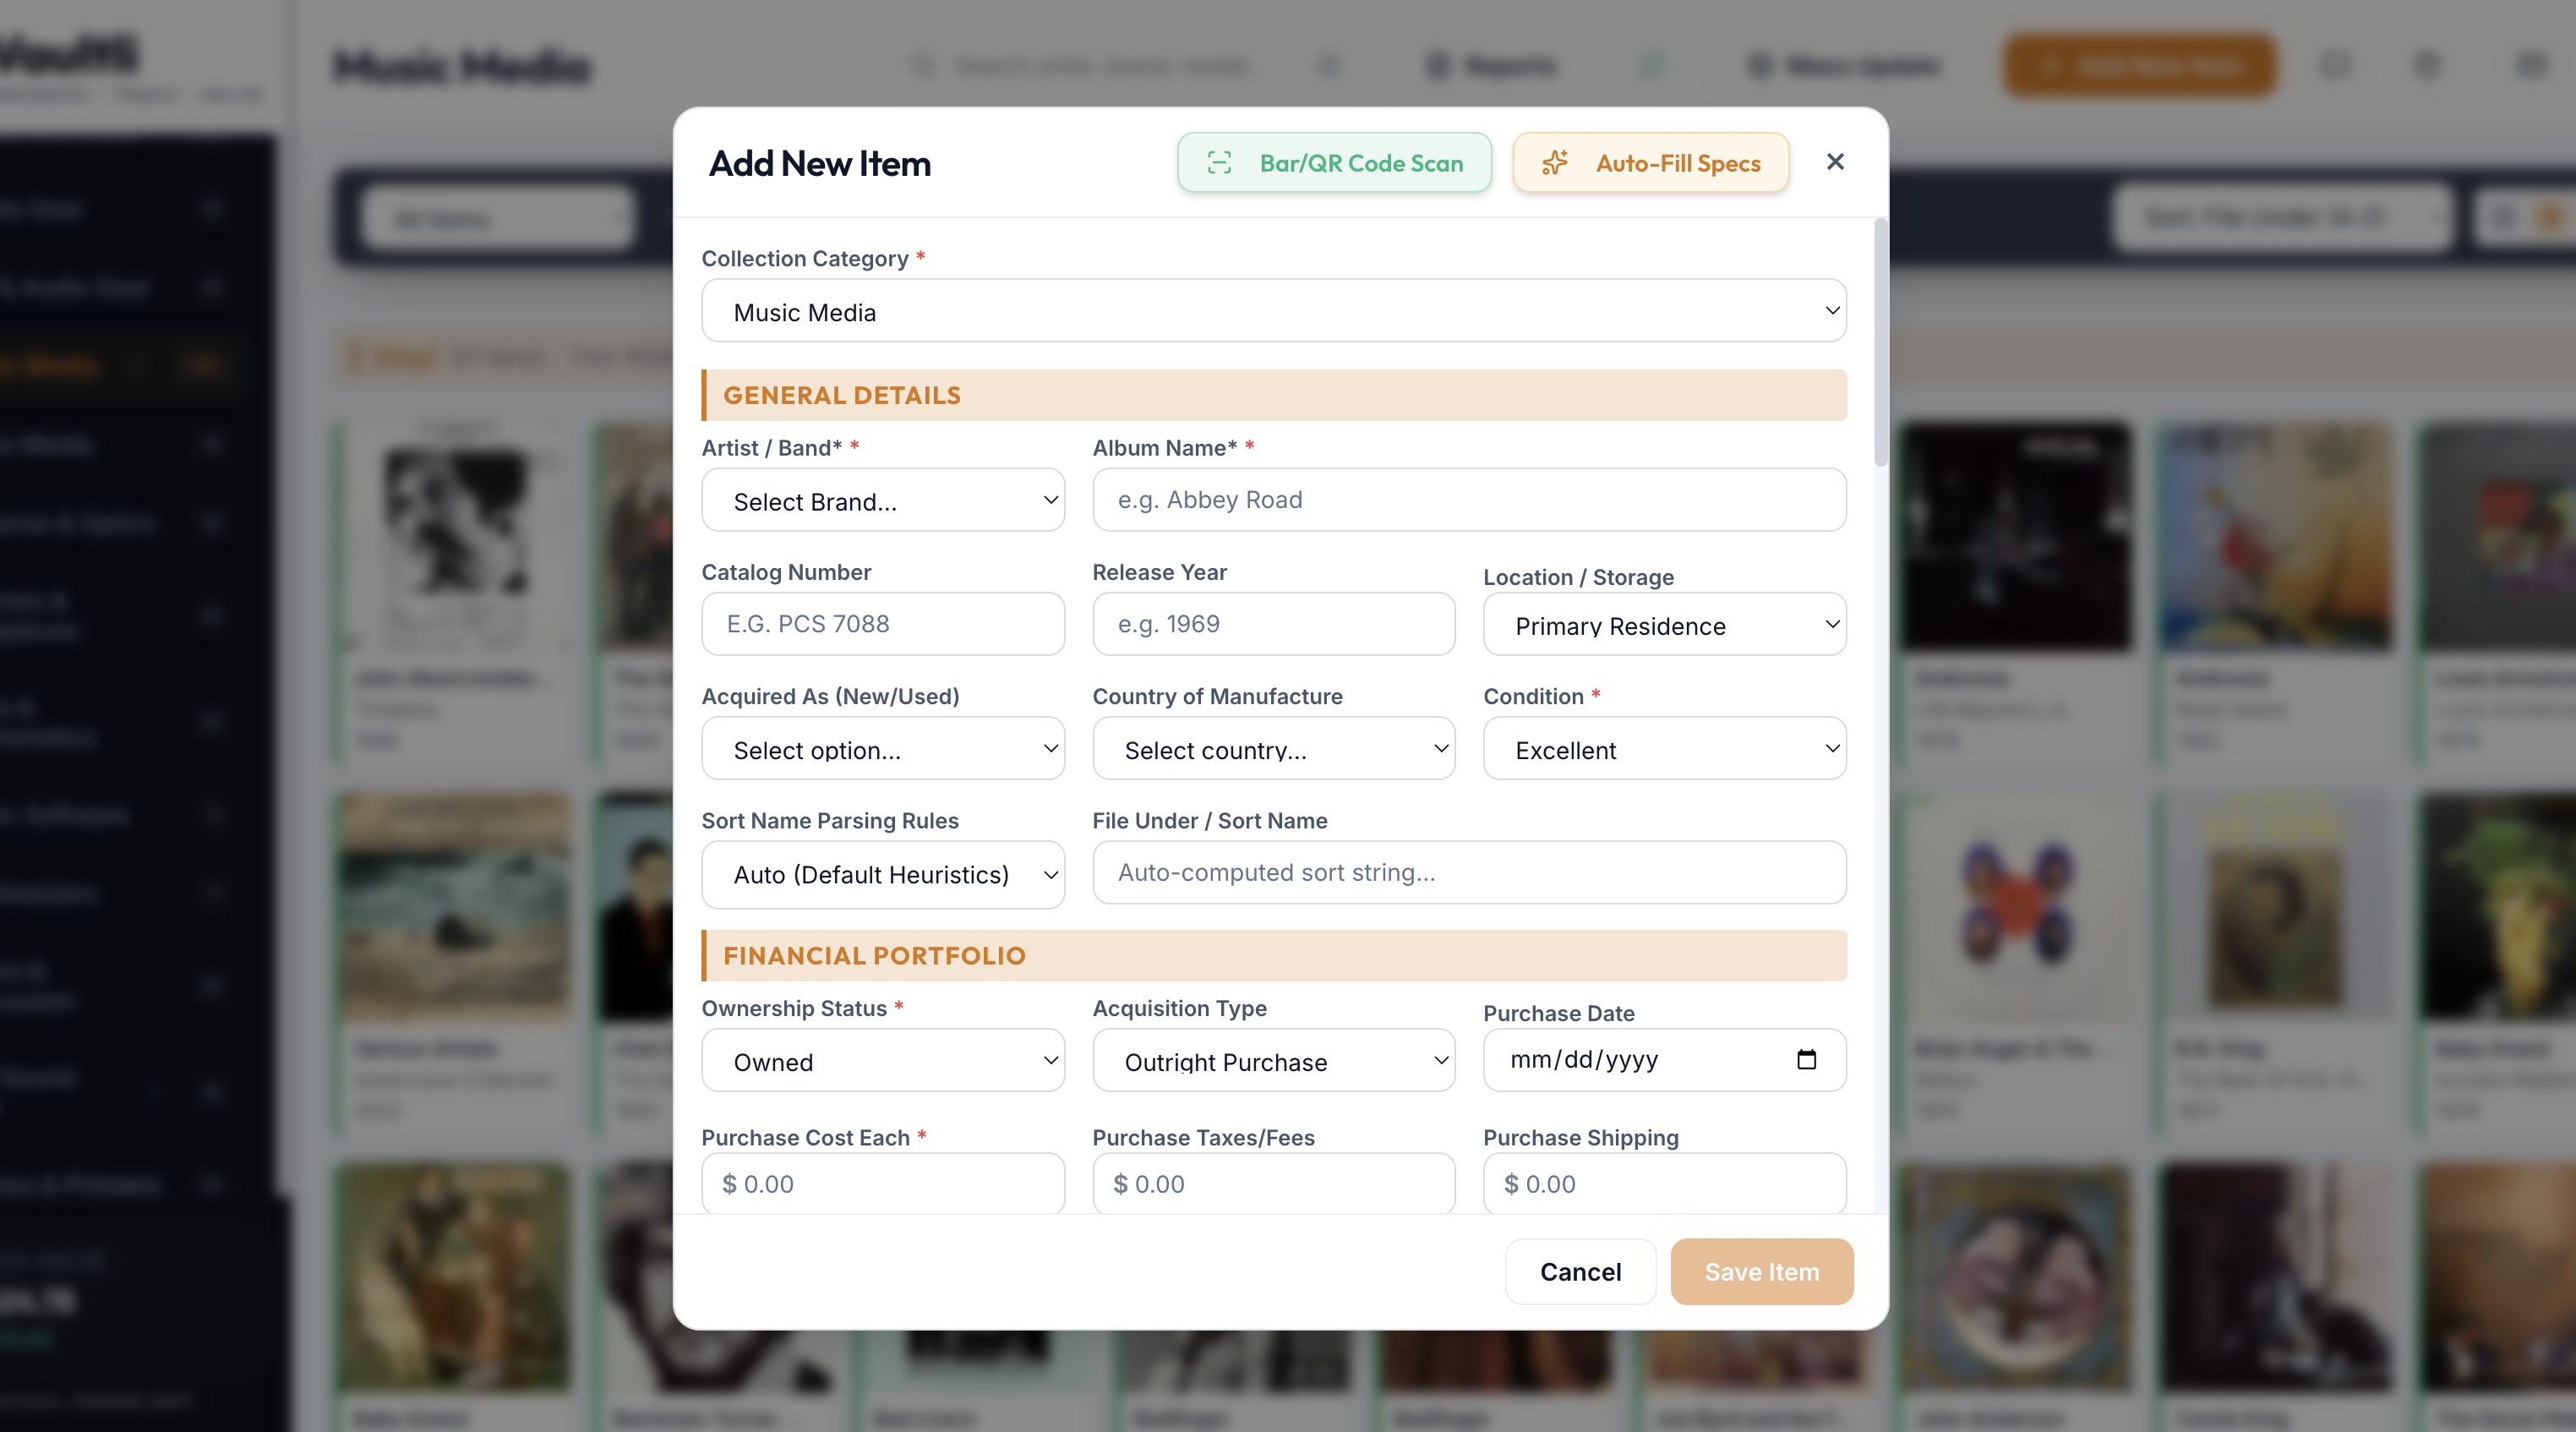
- Select the target Collection from the sidebar, then click Add New Item in the top toolbar.
- Confirm the Collection Category at the top of the modal (it defaults to whichever Collection you had open).
- Use Bar/QR Code Scan or Auto-Fill Specs if the item has a barcode or catalog number — see below — or fill in General Details manually.
- Complete the Financial Portfolio section: Ownership Status, Acquisition Type, Purchase Date, and cost fields. These drive everything in Chapter 4.
- Scroll to Description & Media to attach photos or documents (see the Media Pipeline below), then click Save Item.
Group Records: Tracking Quantities of Like Items
Not everything you own is best tracked as one standalone item. When you have several acquisitions of essentially the same thing — a case of the same wine across different vintages, or the same model of microphone bought in a few separate purchases — click New Group Record instead of Add New Item. A Group Record is a lightweight parent entry (it skips fields that don't apply at the group level, like Serial Number, Condition, or an individual Purchase Date) that exists purely to roll up the individual purchase records underneath it.
Each individual acquisition is still entered as its own full item — with its own quantity, purchase date, cost, and condition — and Vaultli automatically links it to the matching Group Record the moment its Brand and Model match, in either order: add the group first and items link to it as they're saved, or add items first and create the group afterward to sweep up any existing unlinked matches. The Group Record's own form then shows a live Grouped Items list plus aggregated Group Financials — total and average cost, and total and average current value — computed automatically across every linked item, so you always know your total count and blended cost basis for that wine or that microphone without adding up each purchase by hand.
Autofill Intelligence
Auto-Fill Specs looks up a UPC, barcode, or catalog number against external catalog sources (for example Discogs and MusicBrainz for music) and returns matched metadata — artist, title, year, genre, and similar — for you to review before it's applied to the form. For eligible items it also resolves cover art or product imagery automatically, downloading and re-compressing it to an efficient local copy rather than hot-linking to an external CDN that could go missing or rate-limit you later.
The Media Pipeline
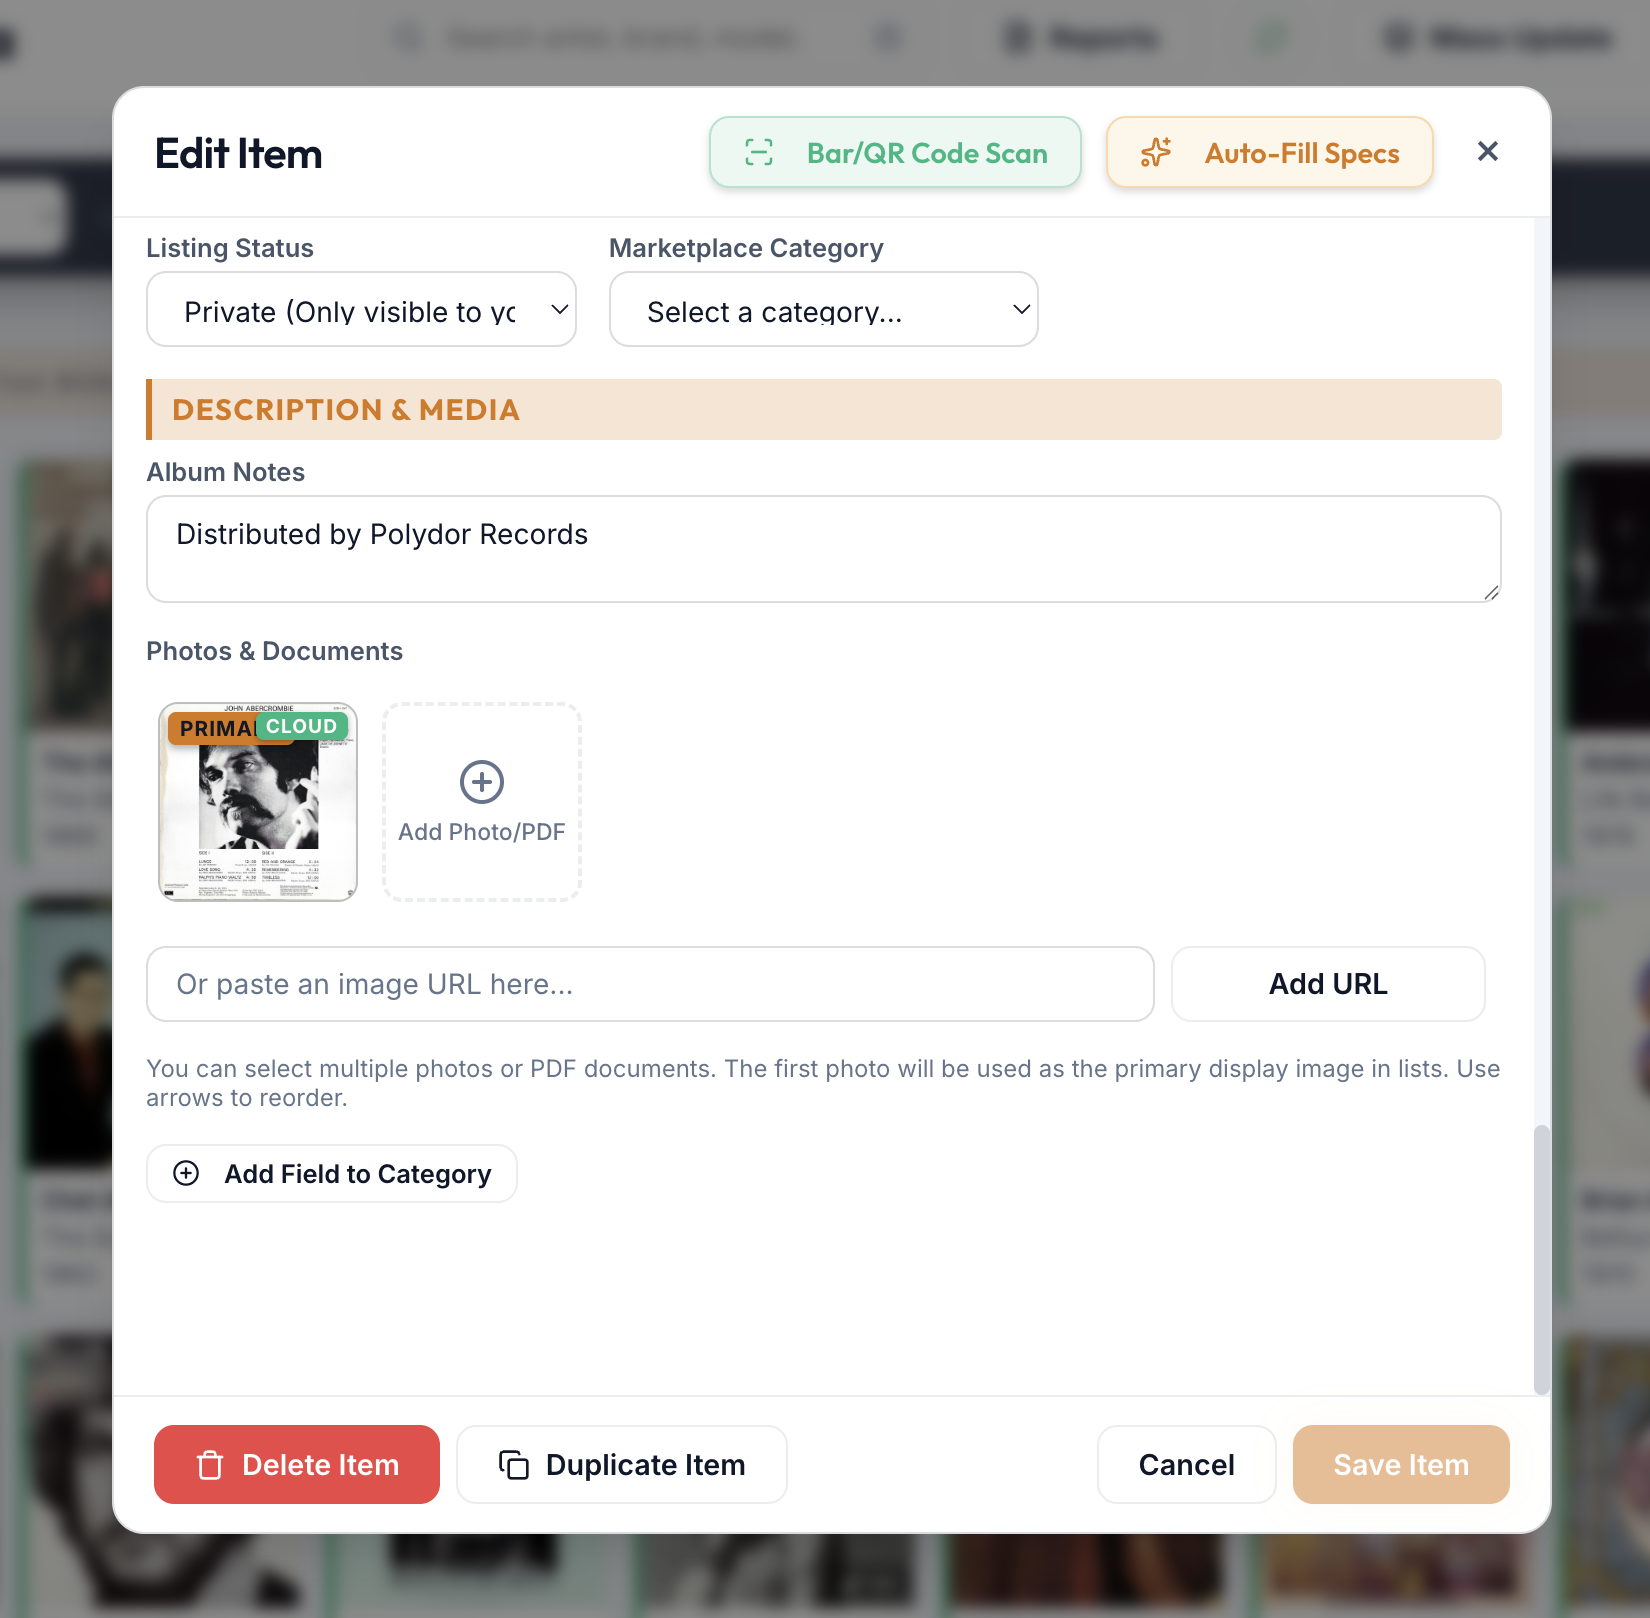
Every item has a Photos & Documents gallery that treats images and PDFs as one unified list. You can click to browse, drag-and-drop files directly onto the gallery, or paste an image URL. The first photo in the list is automatically your item's Primary image — the "beauty shot" used everywhere the item appears in list and grid views — and you can reorder photos with the arrow controls to change which one holds that spot.
Pasted image URLs are stored as links, not saved copies. Clicking to browse or dragging a file onto the gallery downloads and stores a permanent local copy. Pasting a URL instead just keeps the link as-is — if that website ever takes the image down, renames it, or goes offline, the photo can disappear from your item later with no warning. For anything you want to keep for good, save the image to your device first and add it as a file rather than a link.
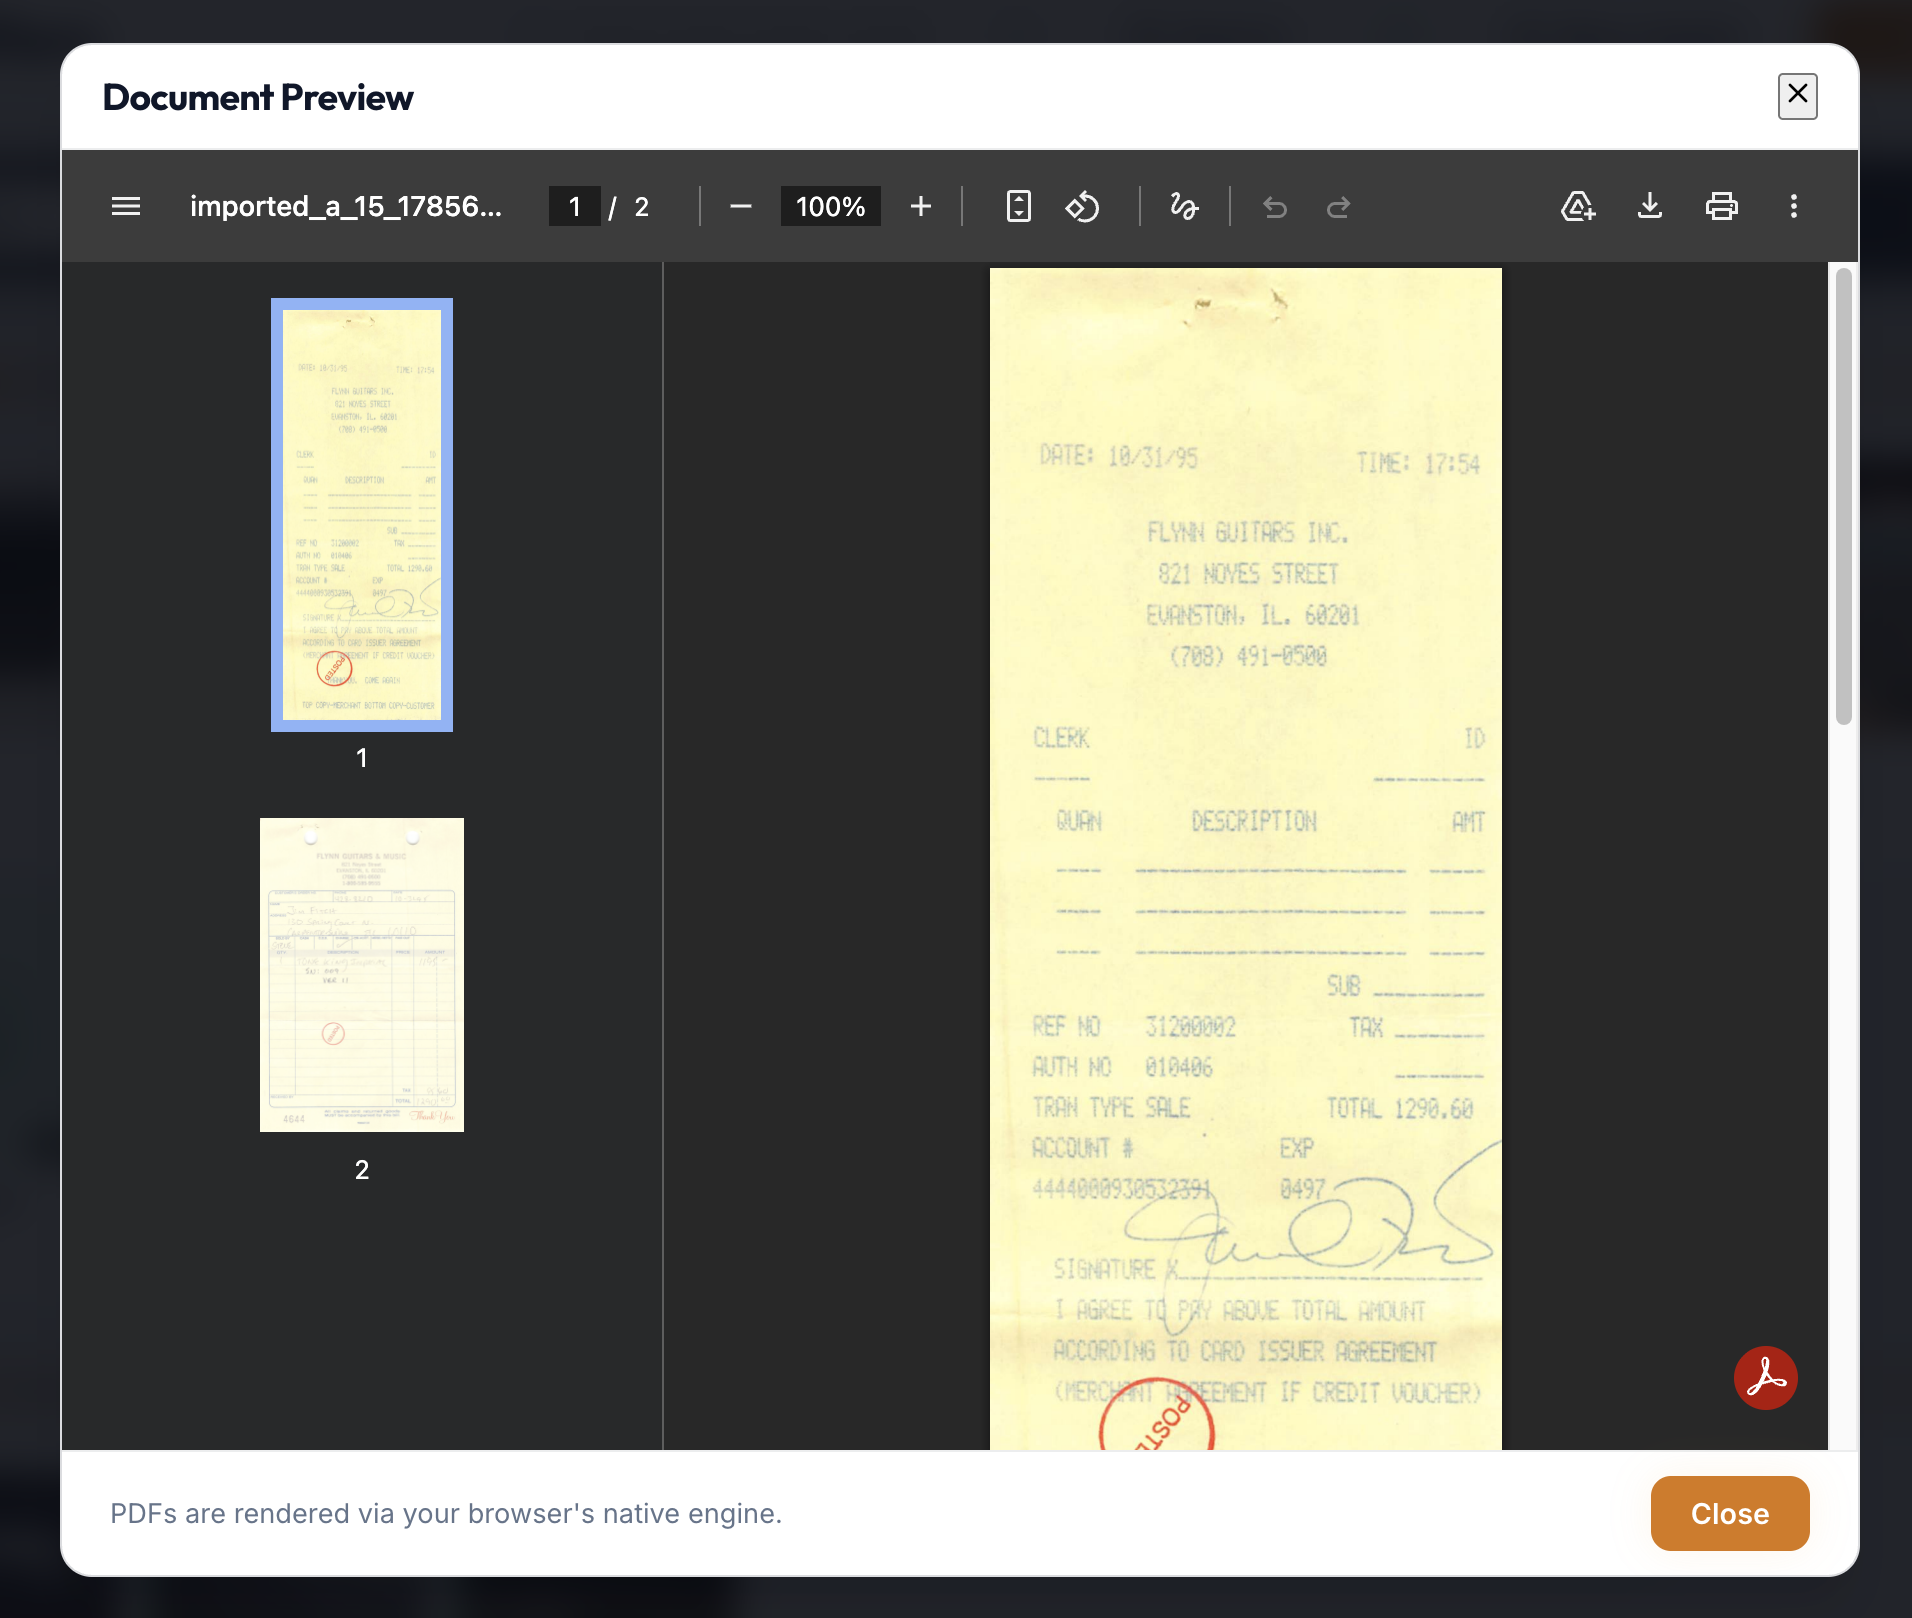
PDFs work exactly the same way as photos — drag in a scanned receipt, warranty card, or appraisal document and it joins the gallery as its own card, opening in a full in-app viewer on click.
4. Ownership States & The Financial Ledger
Every item carries an Ownership Status that drives how it's counted, valued, and displayed. Vaultli's status list is more granular than a simple owned/sold toggle, so your dashboard totals stay accurate through every stage an item actually passes through.
The Lifecycle Pipeline
Not Yet Owned
Wishlist — tracked for planning purposes without affecting your owned-portfolio totals.
Actively Held
Owned, Hold, Loaned Out — all count toward your live portfolio value; Loaned Out simply flags that the physical item is temporarily elsewhere.
Listed for Exit
For Sale and Maybe Sell — still counted as owned, but flagged as items you're actively considering parting with.
Disposed
Sold, Gifted, Donated, Returned, Traded-In, Stolen, Destroyed/Scrapped — removed from active portfolio value and rolled into Realized Delta instead.
Financial Tracking
An item's cost basis is built from Purchase Cost plus optional Taxes/Fees and Shipping, captured once at acquisition. Its current market valuation is a separate, editable field you update as prices move. The difference between the two is your gain or loss — unrealized while you still own the item, realized the moment its status changes to a disposed state like Sold or Donated.
The Valuation Dashboard
The Dashboard's top-row tiles roll every item in every Collection into five portfolio-wide numbers:
Below the tiles, the Category Value Allocation donut chart breaks total value down by Collection, so you can see at a glance where your capital is actually concentrated.
Estate Planning: The Bequeath Field
Every item's Financial Portfolio section includes a Bequeathed To field — a simple place to record who a specific item should go to, as part of an estate plan or a will. It's entirely optional and has no effect on day-to-day ownership status or valuation; it's there to be captured once, per item, so the information is sitting alongside the item itself rather than a separate spreadsheet you have to keep in sync. It's also included automatically in CSV exports, so an executor or estate planner can get a full item-by-item distribution list without you having to compile one manually. See the Report Generator in Chapter 6 for a dedicated report built specifically around this field.
5. Browsing, Searching & View States
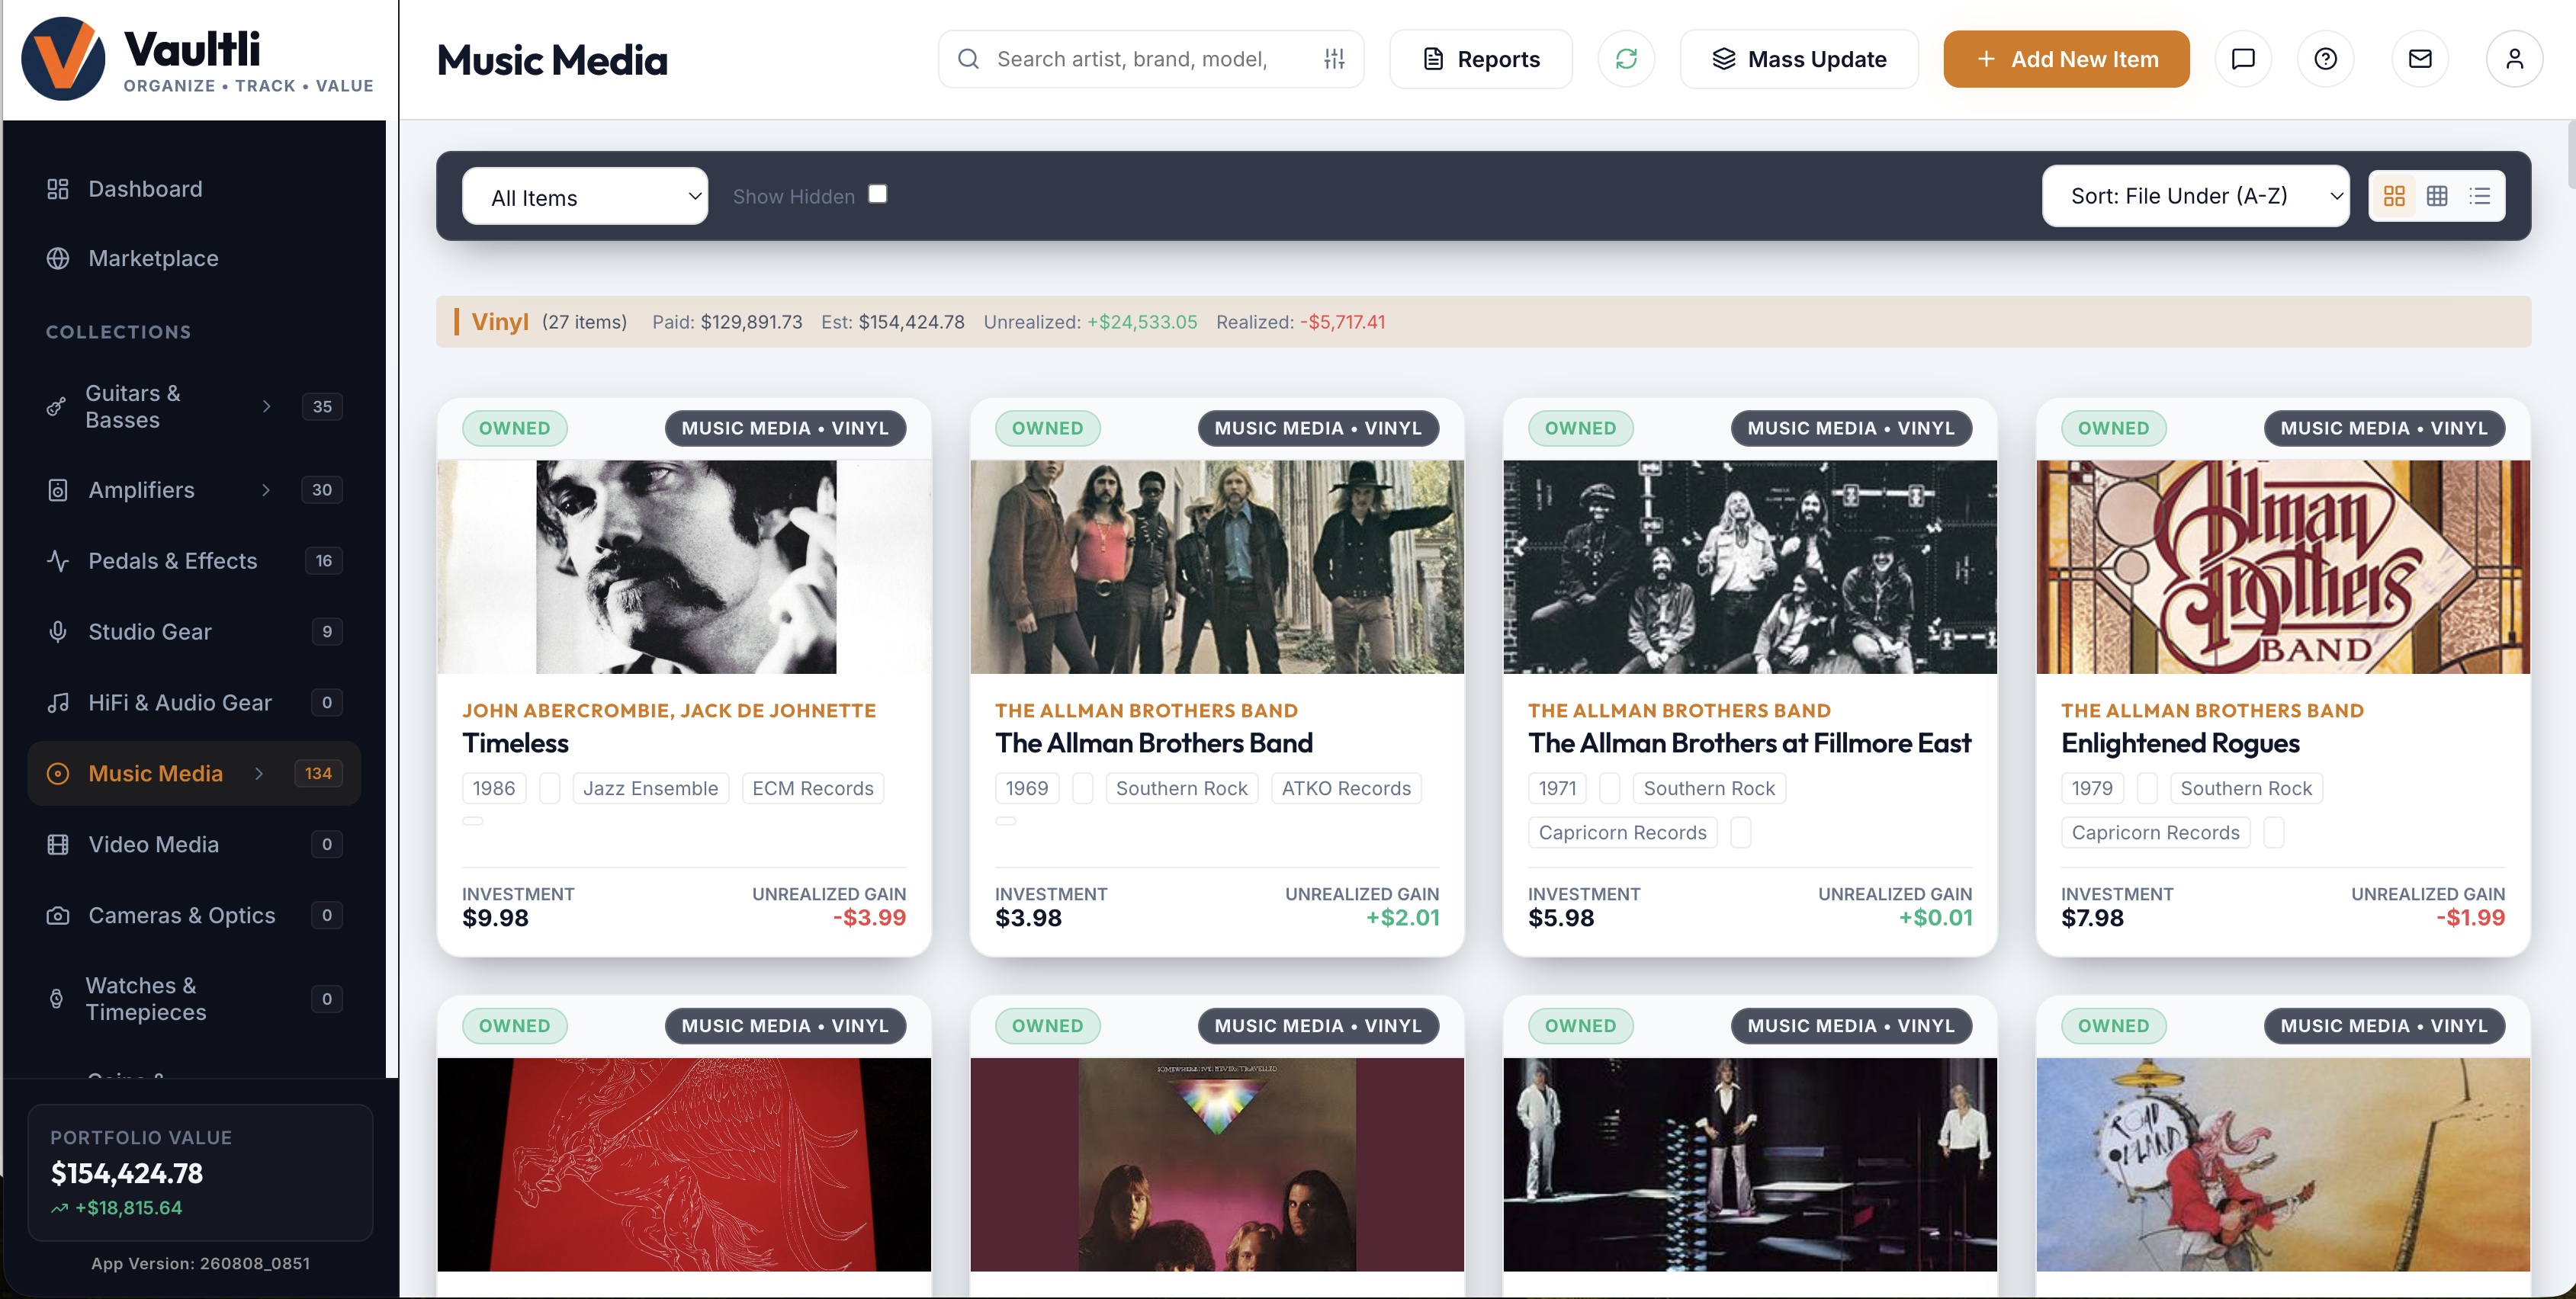
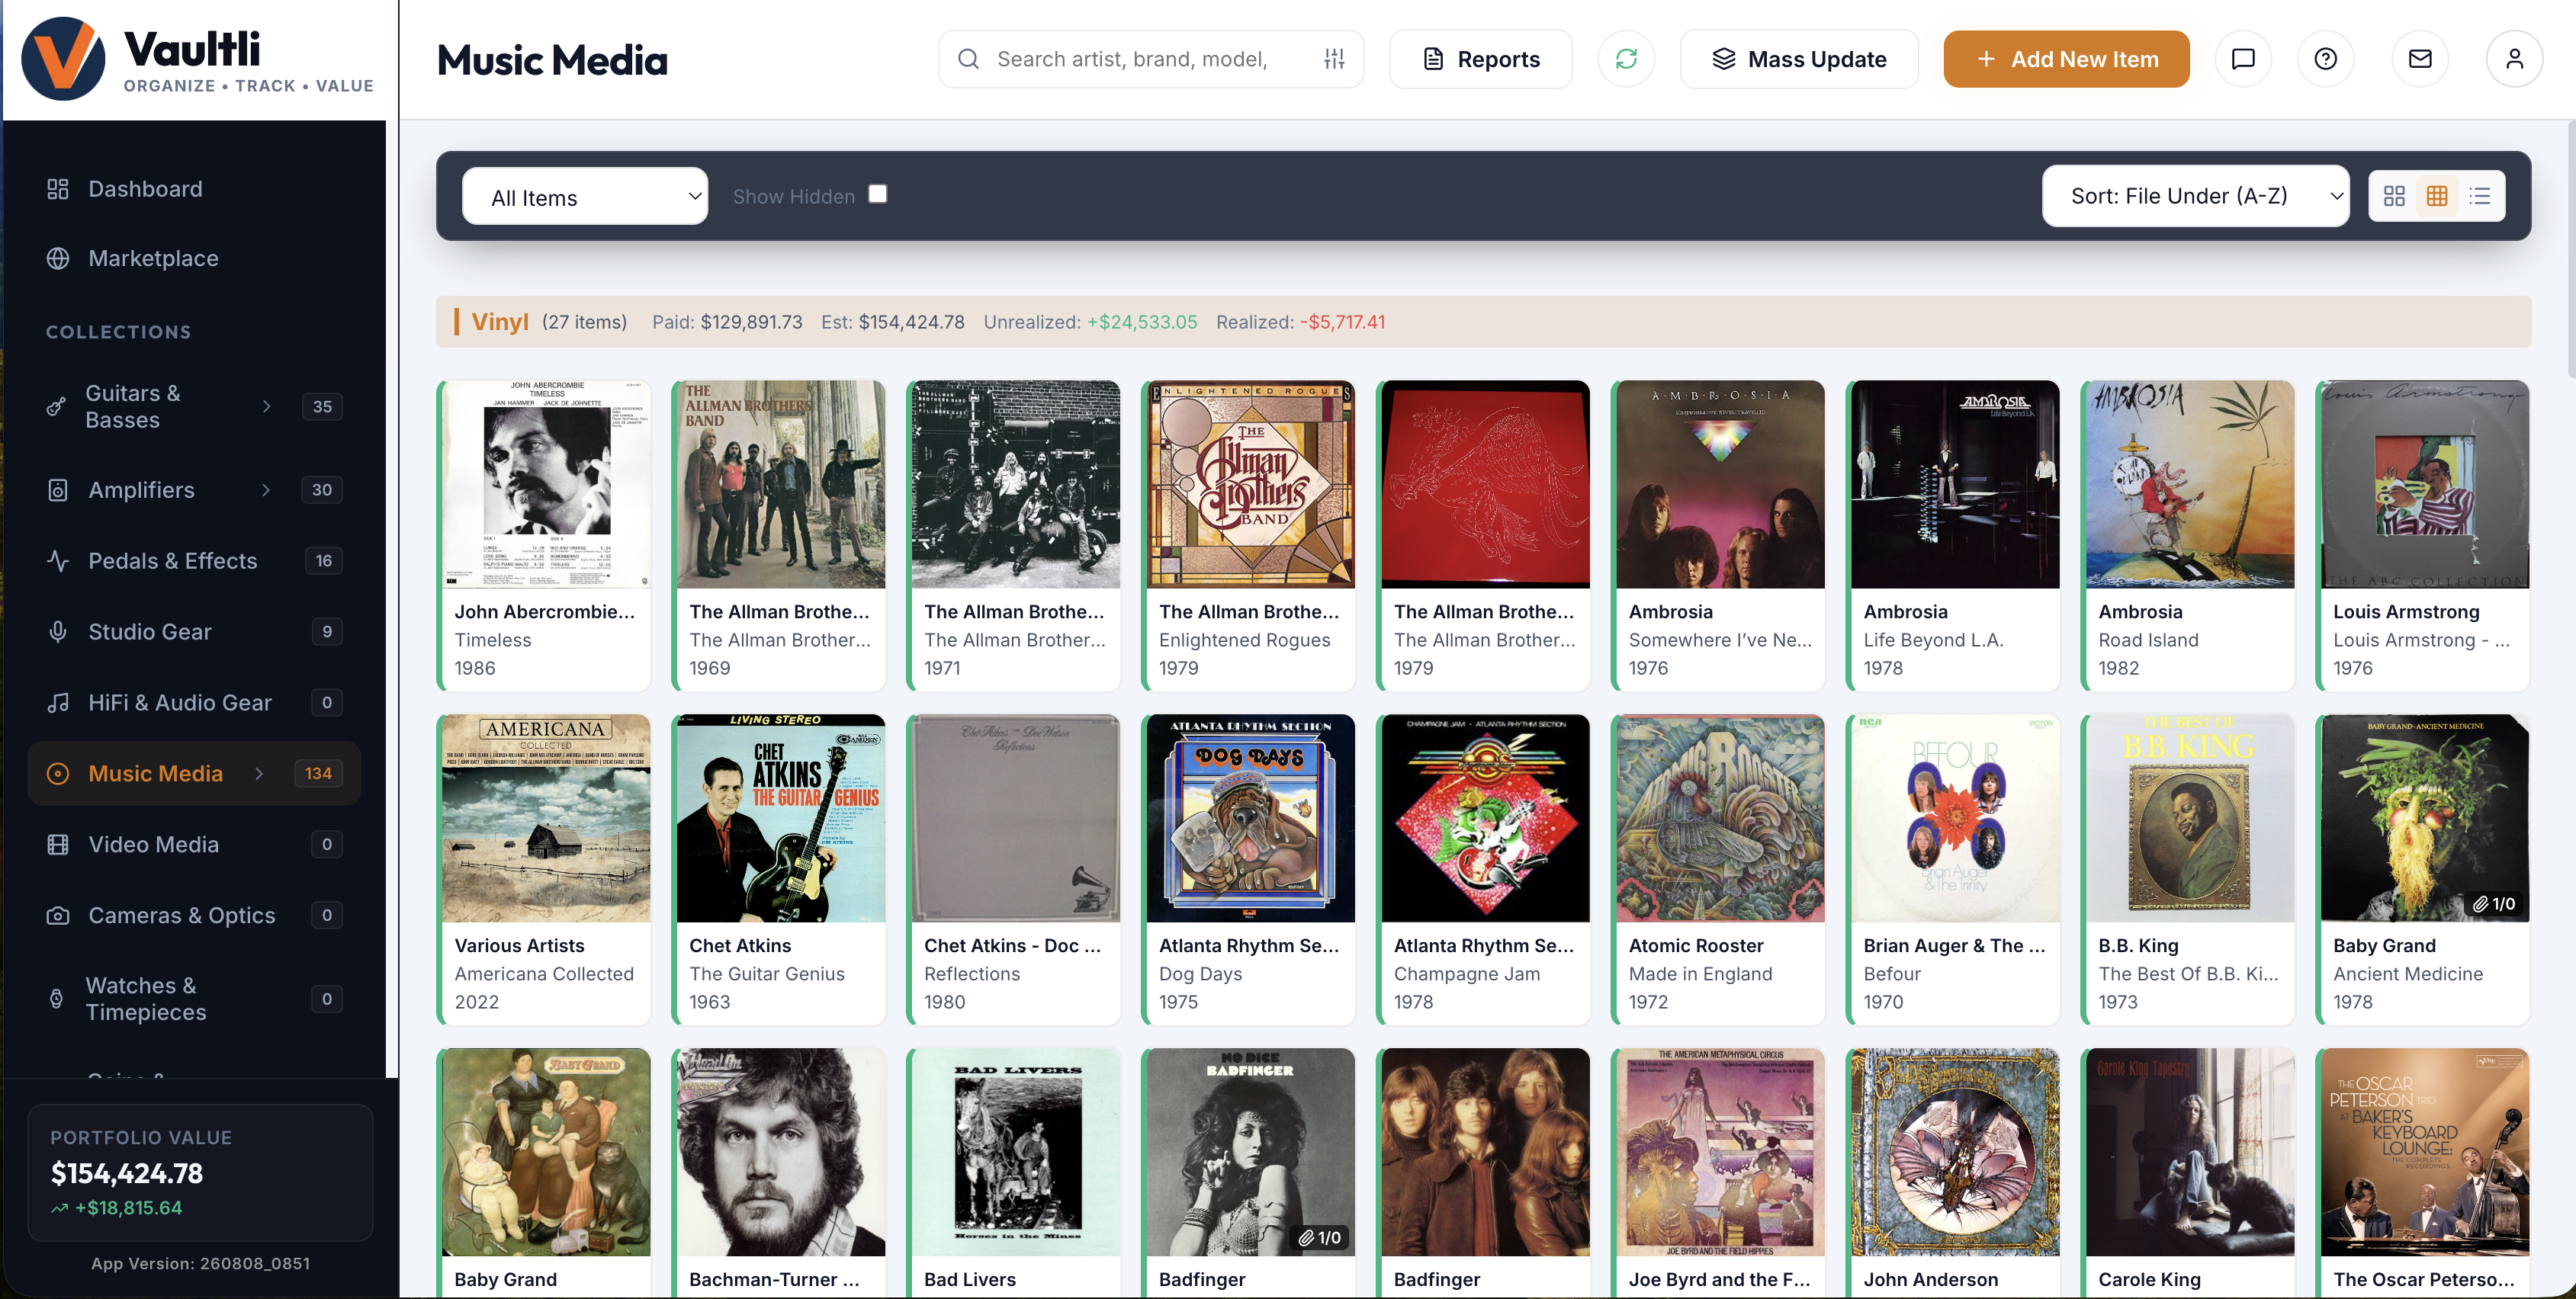
The right view depends on the task: skimming cover art, scanning a compact list, or comparing numbers side by side. Vaultli gives you all three, one click apart, in the view-switcher at the top right of any Collection.
Three View Layouts
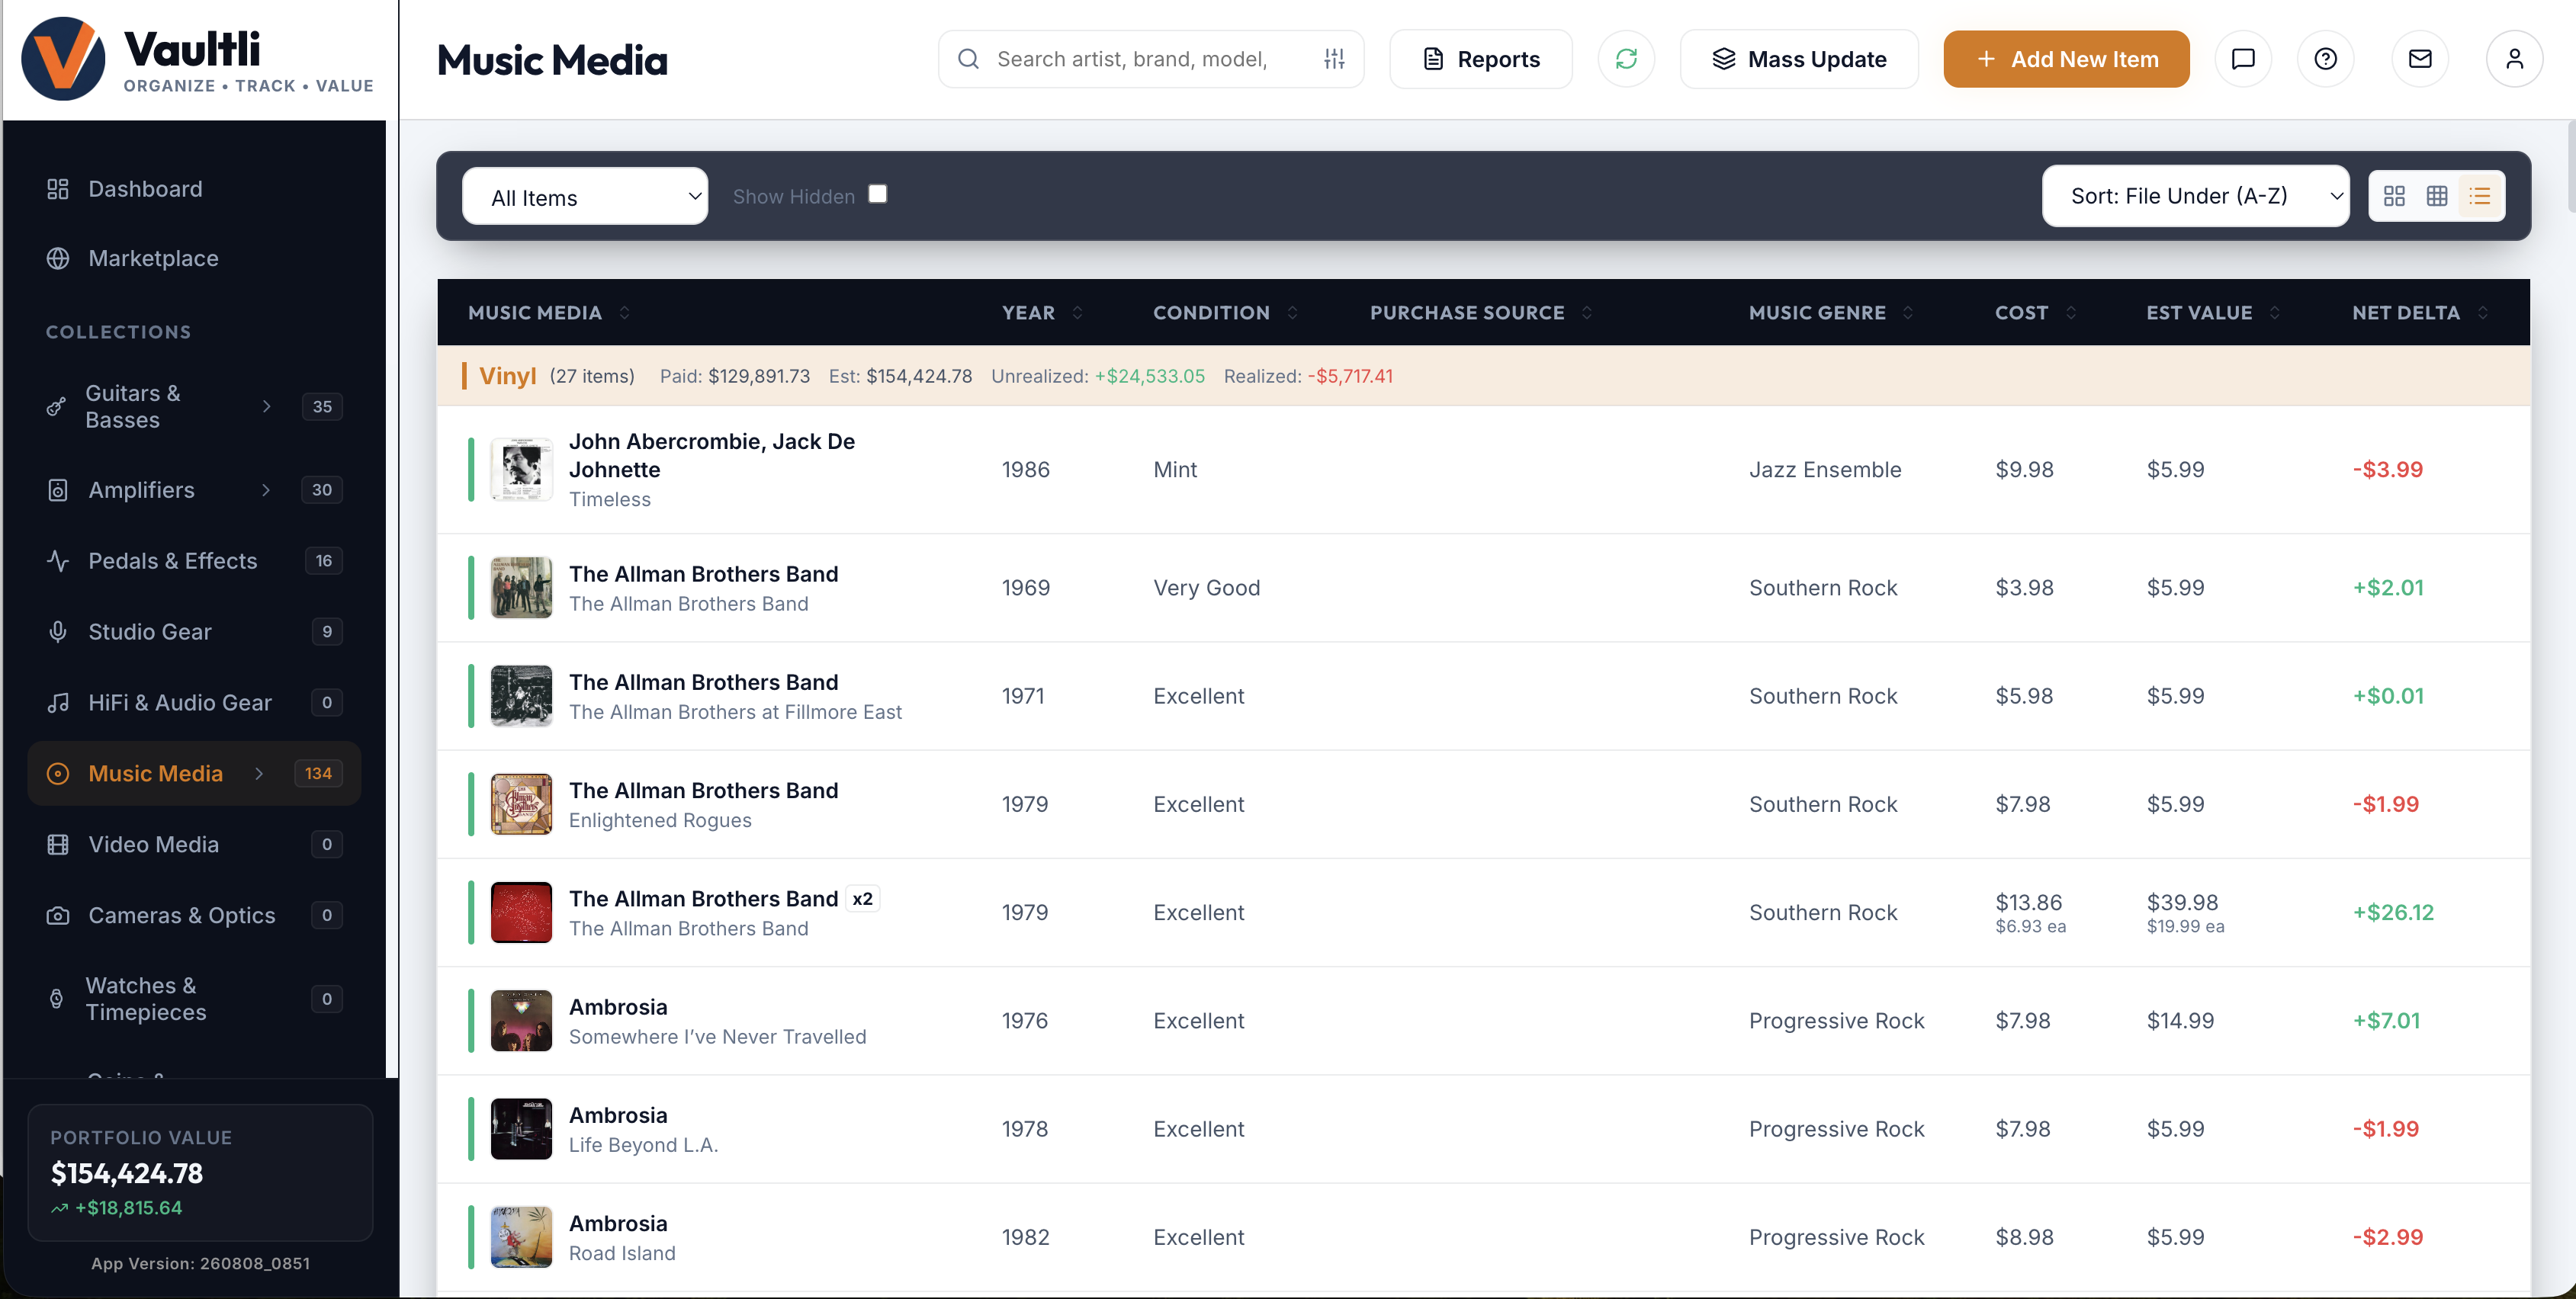
Multi-Parameter Filtering
Every Collection view opens with an All Items filter dropdown for narrowing by Ownership Status, plus a Show Hidden toggle for items you've deliberately tucked out of daily view. The filter icon beside the search bar opens the advanced panel for stacking additional conditions — category-specific dropdown values, valuation ranges, and custom field tags — so a large Collection stays navigable no matter how it's grown.
Global Instant Search
The search bar at the top of every Collection queries as you type, matching across both system fields (Brand, Model, Year…) and every custom field you've defined for that Collection — so a search for a pressing plant, a serial number fragment, or a custom tag surfaces results just as reliably as a search by artist or brand.
Mass Update: Bulk-Editing Many Items at Once
Click Mass Update in the top toolbar to open a dedicated selection screen for editing many items in one pass. Filter by category, search by keyword, or stack an advanced condition (a specific field compared against a value), then check the items you want to change — your selections are preserved as you keep searching, so you can check a few items, clear the search, search for something else entirely, and check more without losing what you already picked.
With items selected, choose a field — Category, Condition, Status, and most other schema fields are available — and a single new value to apply. Confirming updates every selected item and syncs the change to the cloud immediately, which makes reclassifying a whole batch after a schema change, or updating Condition across an entire shelf you just re-inspected, a matter of seconds rather than opening each item individually.
Reading the Badges & Icons
Every card, dense tile, and table row carries a color-coded status badge, matching the lifecycle groups from Chapter 4:
| Badge | Appears When |
|---|---|
| Owned | The default — anything you currently possess without a more specific flag. |
| Hold | Owned, but flagged as one you're deliberately keeping put for now. |
| For Sale | Still owned, but actively listed to sell. |
| Maybe Sell | Still owned, but flagged as one you're considering parting with. |
| Consigned | Checking "This item is currently on consignment" overrides whatever status badge would otherwise show, for as long as the item is actively owned. |
| Sold | Disposed of via a standard sale. |
| Trade-in | A sale where the disposition was specifically a trade-in (Sale Type = Trade-in). |
| Traded-In | The other side of a trade-in link — the item you handed over toward a new purchase (Chapter 4). |
| Gifted | Given away rather than sold. |
| Donated | Donated rather than sold. |
| Disposed / Stolen / Destroyed / Scrapped | Three separate status choices that share the same charcoal-gray styling; the badge text always shows which one actually applies. |
| Wishlist | Not yet owned — tracked for planning without affecting portfolio totals. |
Two statuses share the Owned color: Loaned Out and Returned don't have dedicated colors of their own — they display with the same green styling as Owned, just with their own status text, since both are everyday variations on "still yours."
A handful of smaller icon badges layer on top:
| Icon / Badge | What It Means |
|---|---|
| Blue circular counter (corner of a thumbnail) | Does triple duty: a plain quantity for a multi-unit item, a child-record count for a Group Record parent, or an "X / Y" split of extra photos vs. PDF documents attached to that item — check the tooltip for which one applies. |
| Amber clock icon | That item's valuation is past due for a refresh, based on the Valuation Reminder interval you set in its Financial Portfolio section. |
| "Primary" tag (in the photo manager) | Marks which of an item's multiple photos is the cover image used on cards, lists, and reports. |
| "Cloud" / "Offline" tag (in the photo manager) | Shows whether that specific photo has already been uploaded to storage ("Cloud") or is still local to this device and waiting to sync ("Offline"). |
| Small gray pills under an item's title | Quick-glance specs — Year, Condition, Source, or a category's chosen highlight field — pulled straight from the item's data rather than a status indicator. |
6. Privacy, Data Portability & The Marketplace
Vaultli is a private inventory system first — nothing leaves your account unless you explicitly say so. The Global Discover Marketplace is the one feature where sharing is possible, and it's built around sender-controlled visibility at every layer: the listing itself, its photos, and its fields.
The Global Discover Marketplace
Any item can be listed from its own edit modal under Marketplace & Sharing, with a Listing Status of Public Showcase (display only), Public Trade, or Public Sale, plus a Marketplace Category so buyers can browse by type. Once listed, other users can message you directly about the item — nothing about your account beyond what you choose to publish is ever exposed.
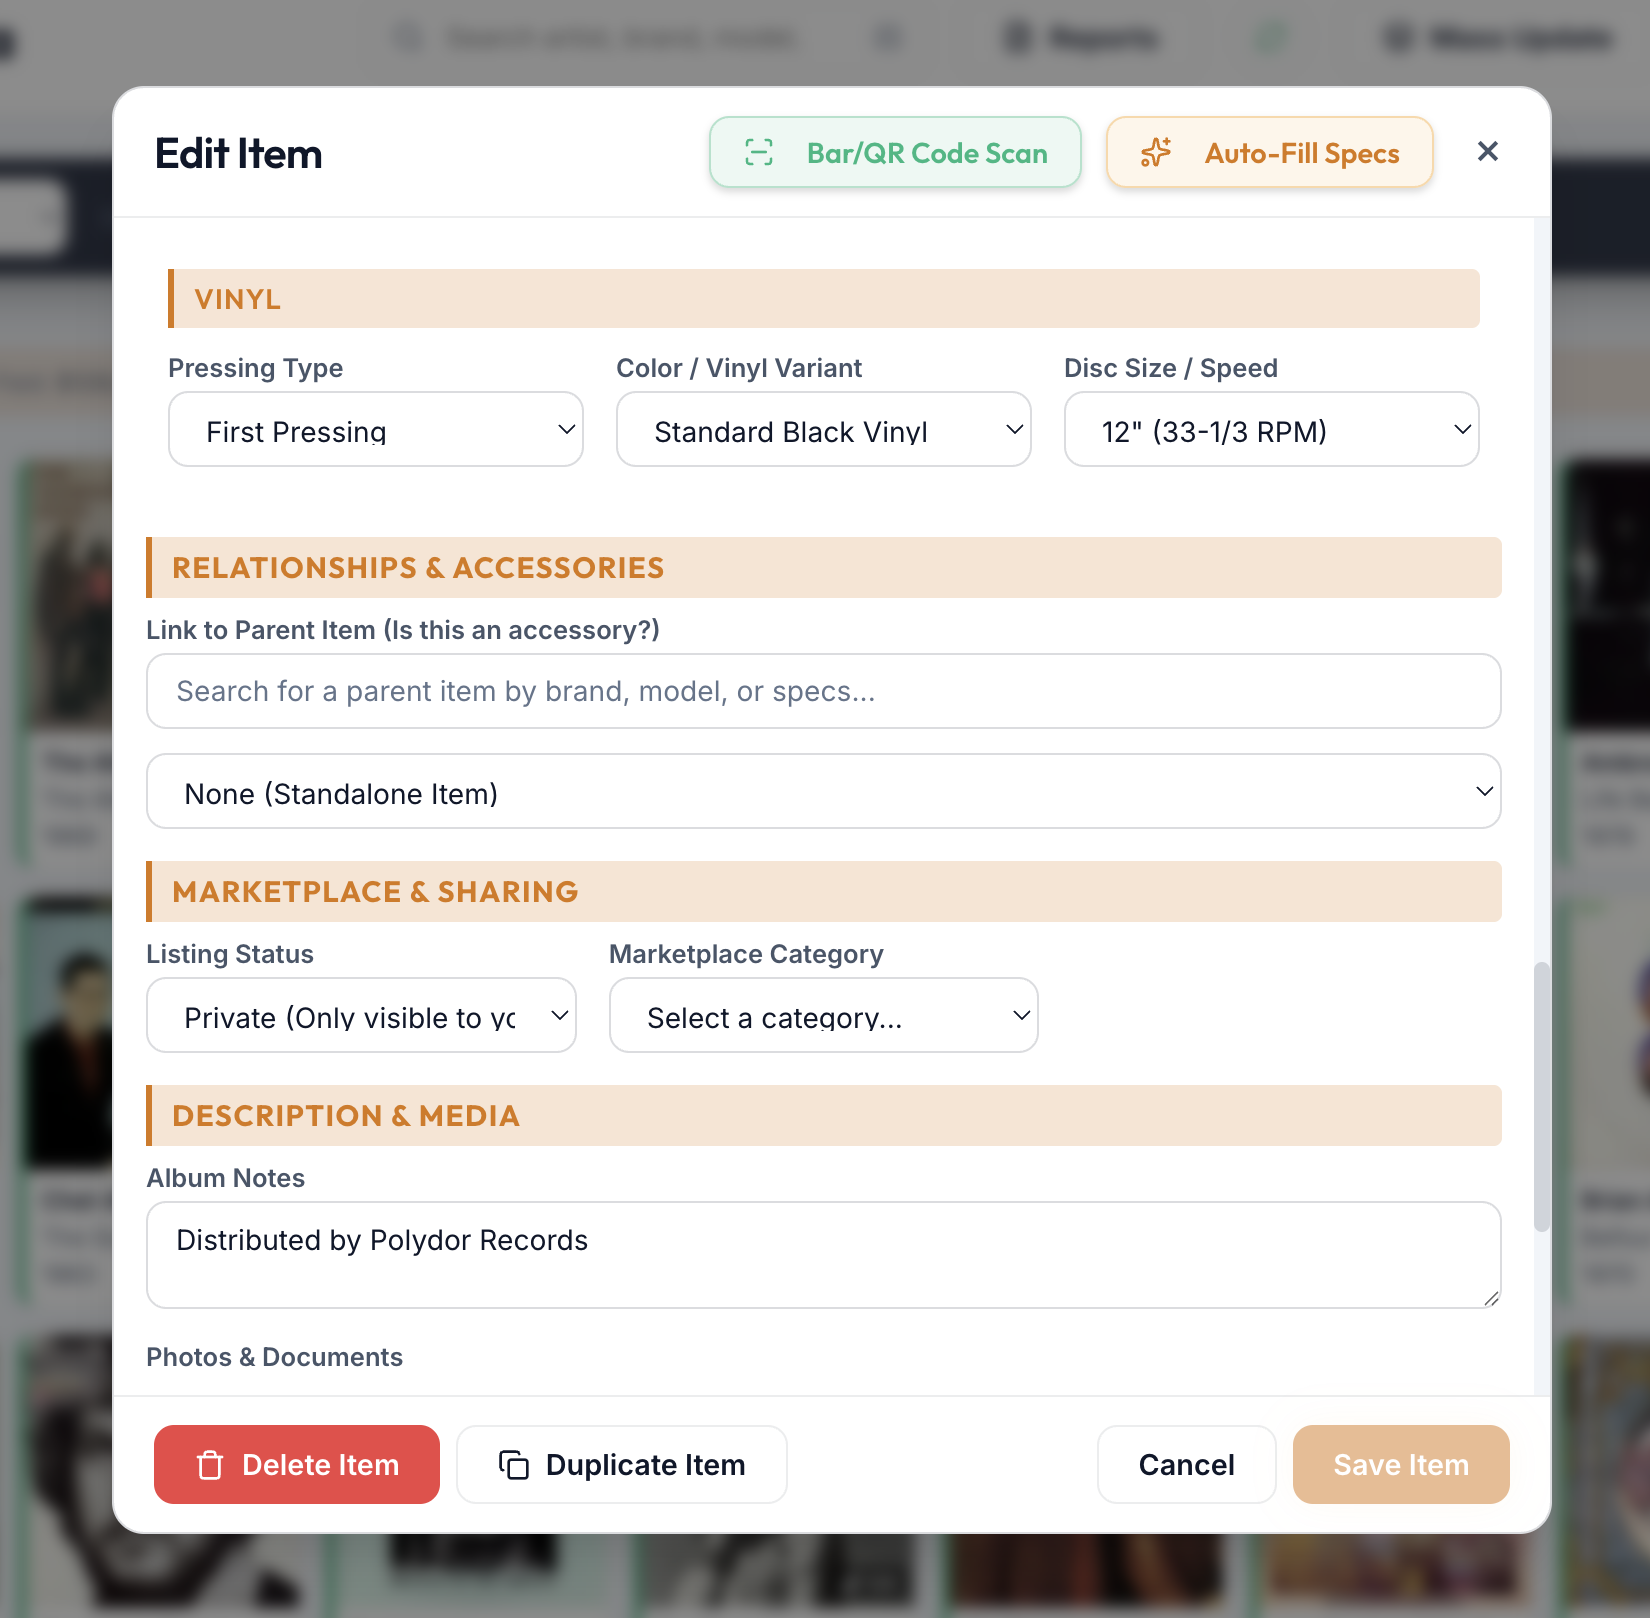
Privacy Controls
Three safeguards apply specifically to what a public listing actually shows:
- Selective "Public" photo checkboxes — every photo in an item's gallery has its own toggle for inclusion in a public listing. Only your current Primary photo is public by default; everything else stays private until you check it in.
- Automatic PDF/receipt exclusion — documents attached to an item (receipts, appraisals, warranty cards) are never eligible for publication, full stop. There's no checkbox that can expose them, by design.
- Private-by-default Notes — the Notes field is excluded from public listings unless a category's schema is explicitly reconfigured to publish it, keeping free-text fields — the ones most likely to contain something you didn't mean to share — off the Marketplace by default.
Field-level visibility for everything else is controlled the same way described in Chapter 2: a field only appears on a public listing if its Marketplace visibility is switched on in that Collection's Layout Editor.
The Report Generator
Click Reports in the top header to open the Report Generator — a dedicated tool for turning your inventory into a formatted document for someone outside the app, separate from the raw CSV/JSON export described below. Pick a report type first, since it changes both the header fields you fill in and the report's framing:
- Personal / Collection Report — a general-purpose valuation report under your own name, suited to a simple portfolio summary for your own records.
- Insurance Report — asks for the insured owner's name, insurance carrier, and policy or reference number, and produces a Gear Valuation & Insurance Report formatted for a claims adjuster or to satisfy a policy's scheduled-items documentation requirement. This is the report worth using before you ever need to file a claim, not after.
- Estate & Testamentary Distribution Statement — asks for the testator's name, the estate executor or trustee, and a will/trust reference, and lays out each item's current value alongside its Bequeathed To field from Chapter 4, giving an executor a ready-made distribution statement.
Whichever type you choose, apply filters — category, ownership status, brand, model, or acquisition source — to scope the report to exactly the items it should cover, and choose whether to include photos and specifications. From there, download a structured CSV for further analysis, or generate a formatted, print-ready PDF for handing to a carrier, adjuster, or executor.
Data Portability
Your data is never locked in. Settings → Import / Export lets you download your complete portfolio as a portable JSON file (a full-fidelity backup, restorable back into Vaultli) or a CSV file (a flat spreadsheet suited to sharing with an insurance agent, an estate planner, or anyone who just wants the numbers). The same screen accepts a JSON or CSV file back in for import, and offers a curated sample collection if you'd like to explore the app with realistic data before committing your own.
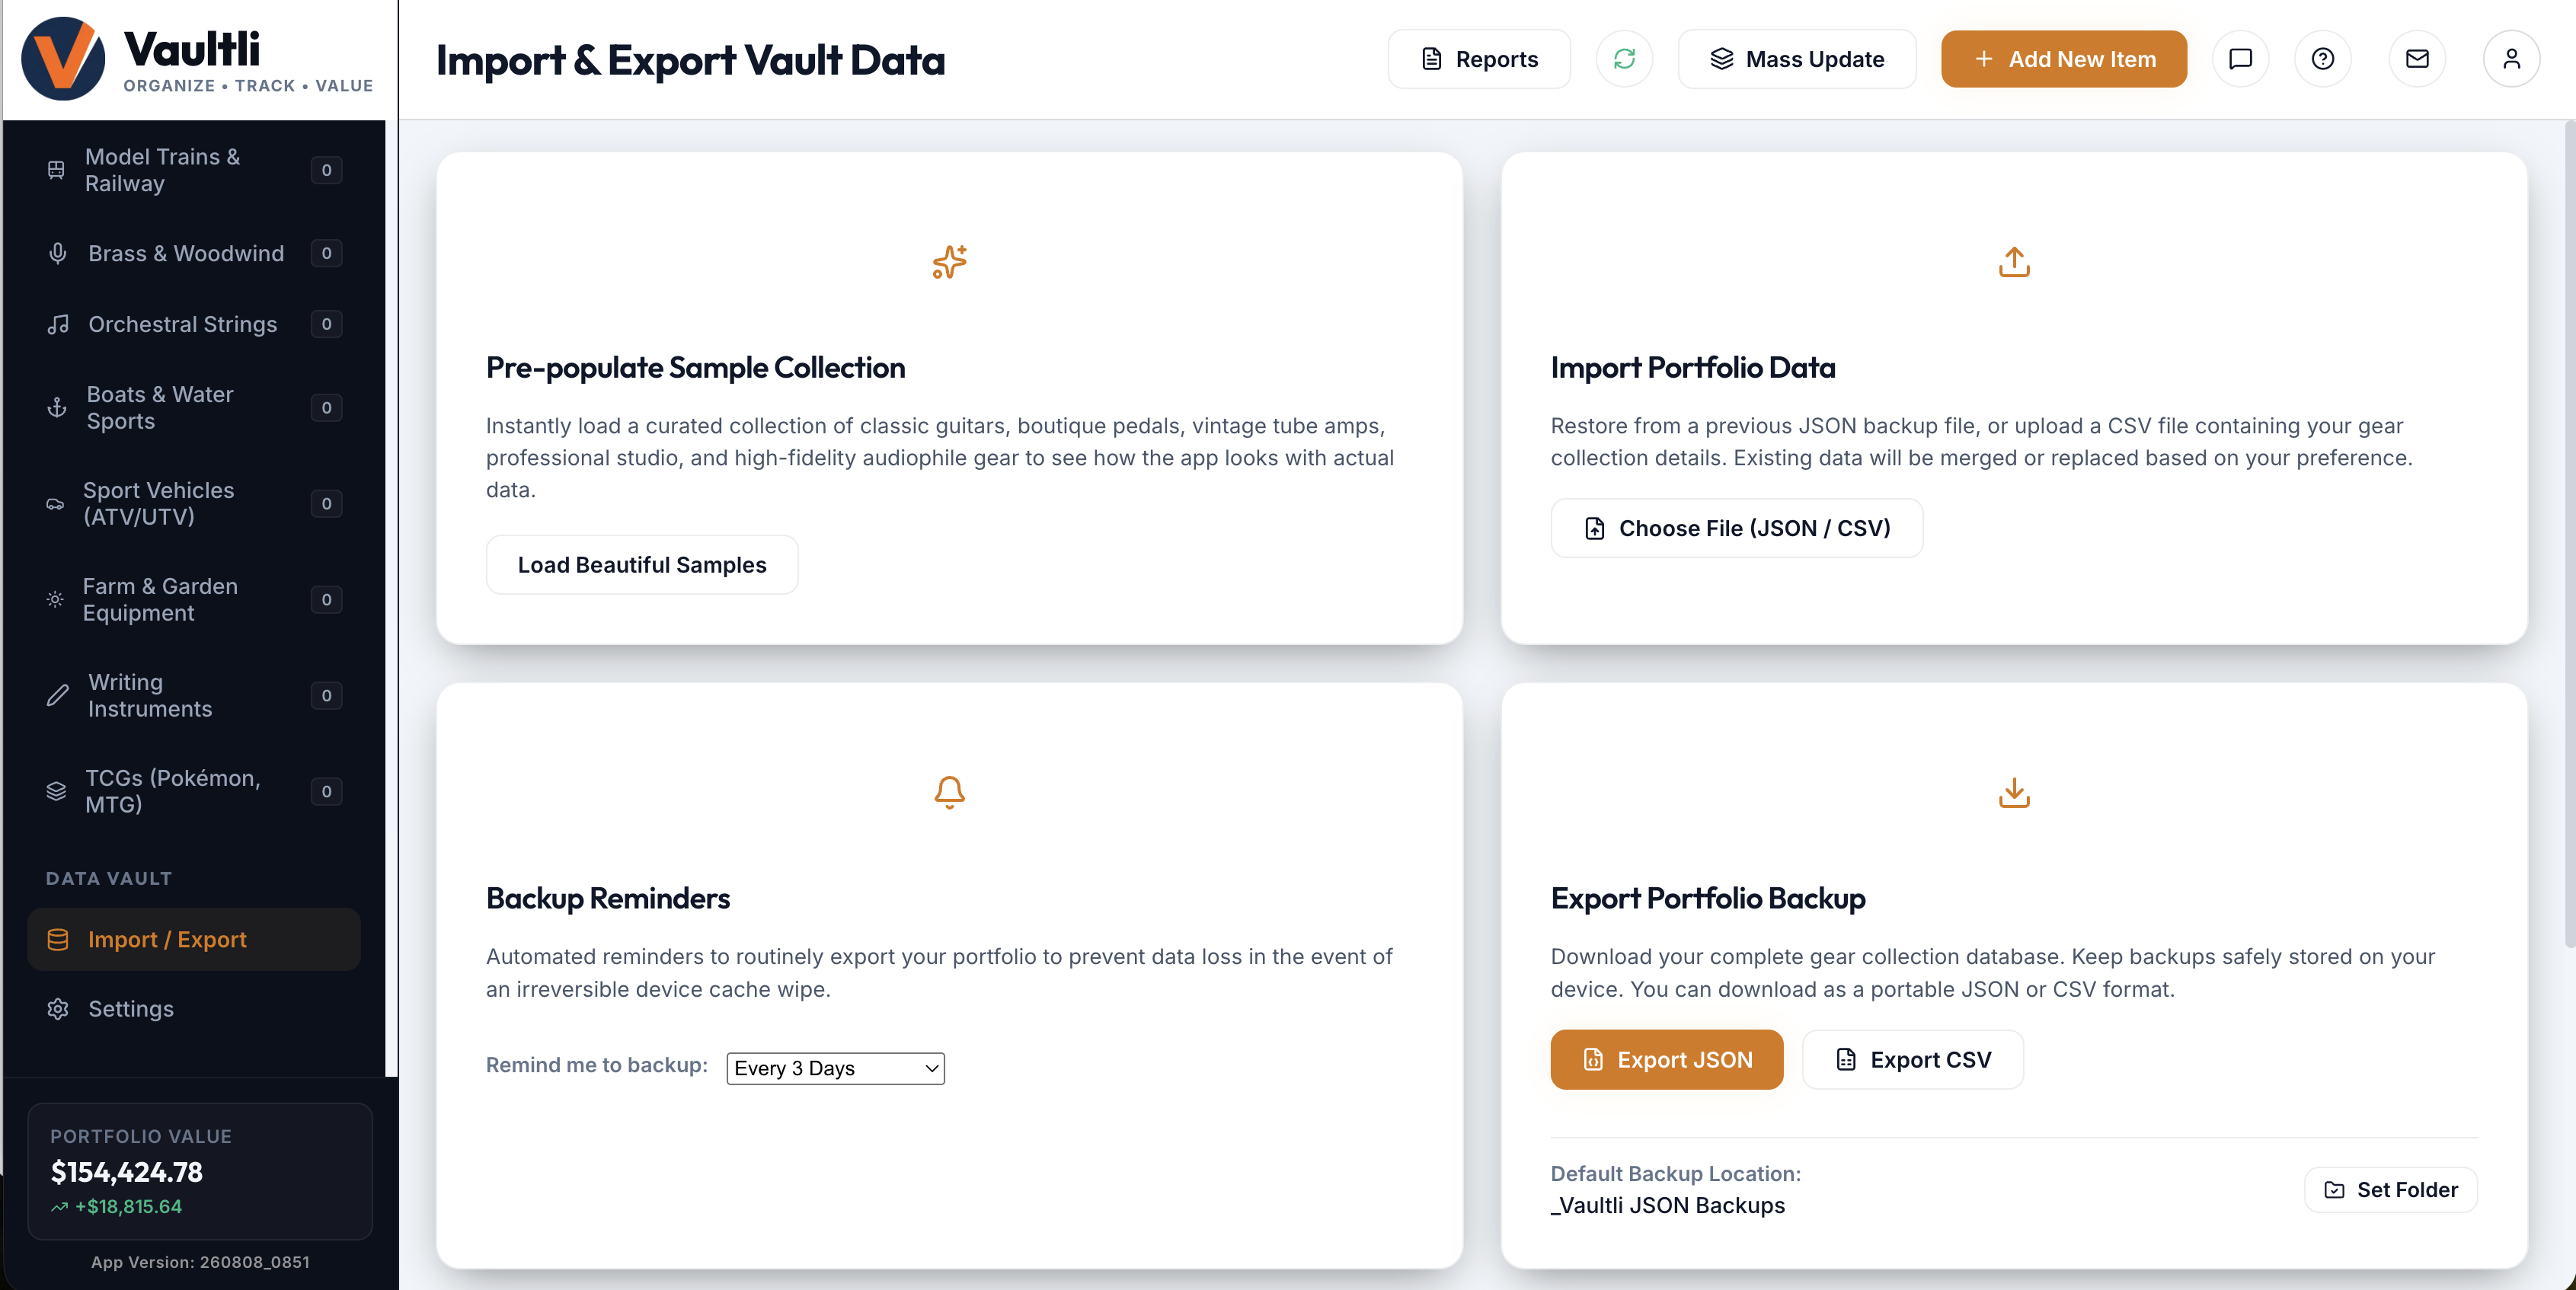
Set a backup reminder — and a default folder to go with it. Turn on the "Remind me to backup" interval on this screen during your first session, then also click Set Folder next to Default Backup Location to choose a save destination once (a modern-browser feature — Chrome or Edge). With a folder set, the "Save Backup Now" button on the reminder popup writes a fresh JSON export straight to that folder automatically, with no save dialog to click through — the whole backup takes less than a second. That's what makes the reminder genuinely easy to act on every time it appears, instead of something you keep dismissing.